1. 前言
DevOps是一种将开发(Development)和运维(Operations)相结合的软件开发方法论。它通过自动化和持续交付的方式,将软件开发、测试和部署等环节紧密集成,以提高效率和产品质量。在本篇博客中,我们将介绍如何使用GitLab、Jenkins和Kubernetes(k8s)来构建一个完整的CI/CD解决方案。
CI/CD 流程图:
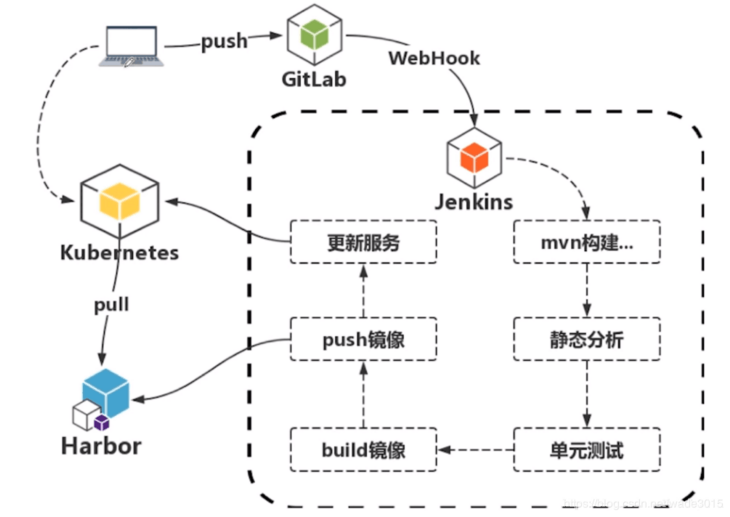
程序员写好代码之后,向 gitlab 代码仓库提交代码,gitlab 检测到变化之后,触发 CI/CD 服务器Jenkins,CI/CD 服务器 Jenkins 构建镜像,镜像构建好之后推送到镜像仓库,最后使用新的镜像在Kubernetes(k8s)环境部署。
实验说明:
本次实验只使用了一个 k8s 集群,通过不同的名称空间来隔离不同的环境。
- cicd-tool 名称空间:部署 CICD 相关服务。
- production 名称空间:模拟生产环境。
- test 名称空间:模拟测试环境
2. 安装 jenkins
2.1. 创建 jenkins.yaml 文件
采用的镜像 jenkins/jenkins:lts 是 jenkins 官网的默认镜像,若想定制自己的 jenkins 镜像,比如将一些插件直接打包到镜像里,可以参考:https: /github.com/jenkinsci/docker
下面有两个版本的 jenkins.yaml,推荐使用版本二。两者唯一的不同就是,版本二将 jenkins 的插件源 mirrors.jenkins-ci.org 解析到了 127.0.0.1:80(安装完后可以进入pod内查看 /etc/hosts 文件,会多一条解析),然后基于 sidecar 设计模式启动了一个监听 127.0.0.1:80 的 nginx,该 nginx 将收到的请求都转发到了清华源,以此提升插件下载速度。
版本一:
# jenkins-master.yaml
apiVersion: v1
kind: Namespace
metadata:
  name: cicd-tool
---
apiVersion: v1
kind: PersistentVolumeClaim
metadata:
  name: jenkins-pvc
  namespace: cicd-tool
spec:
  storageClassName: local-path
  accessModes:
    - ReadWriteOnce
  resources:
    requests:
      storage: 5Gi
---
apiVersion: v1
kind: ServiceAccount
metadata:
  name: jenkins
  namespace: cicd-tool
---
apiVersion: rbac.authorization.k8s.io/v1
kind: ClusterRole
metadata:
  annotations:
    rbac.authorization.kubernetes.io/autoupdate: "true"
  labels:
    kubernetes.io/bootstrapping: rbac-defaults
  name: jenkins
rules:
- apiGroups:
  - '*'
  resources:
  - statefulsets
  - services
  - replicationcontrollers
  - replicasets
  - podtemplates
  - podsecuritypolicies
  - pods
  - pods/log
  - pods/exec
  - podpreset
  - poddisruptionbudget
  - persistentvolumes
  - persistentvolumeclaims
  - jobs
  - endpoints
  - deployments
  - deployments/scale
  - daemonsets
  - cronjobs
  - configmaps
  - namespaces
  - events
  - secrets
  verbs:
  - create
  - get
  - watch
  - delete
  - list
  - patch
  - update
- apiGroups:
  - ""
  resources:
  - nodes
  verbs:
  - get
  - list
  - watch
  - update
---
apiVersion: rbac.authorization.k8s.io/v1
kind: ClusterRoleBinding
metadata:
  annotations:
    rbac.authorization.kubernetes.io/autoupdate: "true"
  labels:
    kubernetes.io/bootstrapping: rbac-defaults
  name: jenkins
roleRef:
  apiGroup: rbac.authorization.k8s.io
  kind: ClusterRole
  name: jenkins
subjects:
- apiGroup: rbac.authorization.k8s.io
  kind: Group
  name: system:serviceaccounts:jenkins
---
apiVersion: apps/v1
kind: Deployment
metadata:
  name: jenkins
  namespace: cicd-tool
spec:
  replicas: 1
  selector:
    matchLabels:
      app: jenkins
  template:
    metadata:
      labels:
        app: jenkins
    spec:
      serviceAccountName: jenkins    # 指定我们前面创建的服务账号
      containers:
      - name: jenkins
        image: jenkins/jenkins:lts-jdk17
        ports:
        - containerPort: 8080
          name: web
          protocol: TCP
        - containerPort: 50000
          name: agent
          protocol: TCP
        resources:
          limits:
            cpu: 1500m
            memory: "6Gi"
          requests:
            cpu: 1500m
            memory: "2048Mi"
        readinessProbe:
          httpGet:
            path: /login
            port: 8080
          initialDelaySeconds: 60
          timeoutSeconds: 5
          failureThreshold: 12
        volumeMounts:
        - name: jenkins-home
          mountPath: /var/jenkins_home
      volumes:
      - name: jenkins-home
        persistentVolumeClaim:
          claimName: jenkins-pvc
---
apiVersion: v1
kind: Service
metadata:
  name: jenkins-init-service
  namespace: cicd-tool
spec:
  type: NodePort
  ports:
  - name: http
    port: 8080
    targetPort: 8080
    nodePort: 31400
  - name: agent
    port: 50000
    targetPort: 50000
    nodePort: 31401
  selector:
app: jenkins版本二:
# jenkins-master.yaml
apiVersion: v1
kind: Namespace
metadata:
  name: cicd-tool
---
apiVersion: v1
kind: PersistentVolumeClaim
metadata:
  name: jenkins-pvc
  namespace: cicd-tool
spec:
  storageClassName: local-path   # 存储类
  accessModes:
    - ReadWriteOnce
  resources:
    requests:
      storage: 5Gi
---
apiVersion: v1
kind: ServiceAccount
metadata:
  name: jenkins
  namespace: cicd-tool
---
apiVersion: rbac.authorization.k8s.io/v1
kind: ClusterRole
metadata:
  annotations:
    rbac.authorization.kubernetes.io/autoupdate: "true"
  labels:
    kubernetes.io/bootstrapping: rbac-defaults
  name: jenkins
rules:
- apiGroups:
  - '*'
  resources:
  - statefulsets
  - services
  - replicationcontrollers
  - replicasets
  - podtemplates
  - podsecuritypolicies
  - pods
  - pods/log
  - pods/exec
  - podpreset
  - poddisruptionbudget
  - persistentvolumes
  - persistentvolumeclaims
  - jobs
  - endpoints
  - deployments
  - deployments/scale
  - daemonsets
  - cronjobs
  - configmaps
  - namespaces
  - events
  - secrets
  verbs:
  - create
  - get
  - watch
  - delete
  - list
  - patch
  - update
- apiGroups:
  - ""
  resources:
  - nodes
  verbs:
  - get
  - list
  - watch
  - update
---
apiVersion: rbac.authorization.k8s.io/v1
kind: ClusterRoleBinding
metadata:
  annotations:
    rbac.authorization.kubernetes.io/autoupdate: "true"
  labels:
    kubernetes.io/bootstrapping: rbac-defaults
  name: jenkins
roleRef:
  apiGroup: rbac.authorization.k8s.io
  kind: ClusterRole
  name: jenkins
subjects:
- apiGroup: rbac.authorization.k8s.io
  kind: Group
  name: system:serviceaccounts:jenkins
---
apiVersion: v1          # 添加 sidecar 配置文件
kind: ConfigMap
metadata:
  name: jenkins-mirror-conf
  namespace: cicd-tool
data:
  nginx.conf: |
    user nginx;
    worker_processes  3;
    error_log  /dev/stderr;
    events {
      worker_connections  10240;
    }
    http {
      log_format main '$remote_addr - $remote_user [$time_local] "$request" '
                      '$status $body_bytes_sent "$http_referer" '
                      '"$http_user_agent" "$http_x_forwarded_for" $request_time';
      access_log    /dev/stdout main;
      server {
          listen 80;
          server_name mirrors.jenkins-ci.org;
          location / {
            proxy_redirect off;
            proxy_pass https://mirrors.tuna.tsinghua.edu.cn/jenkins/;
            proxy_set_header X-Real-IP $remote_addr;
            proxy_set_header X-Forwarded-For $proxy_add_x_forwarded_for;
            proxy_set_header Accept-Encoding "";
            proxy_set_header Accept-Language "zh-CN";
          }
          index index.html index.htm index.php;
          location ~ /\. {
            deny all;
          }
      }
    }
---
apiVersion: apps/v1
kind: Deployment
metadata:
  name: jenkins
  namespace: cicd-tool
spec:
  replicas: 1
  selector:
    matchLabels:
      app: jenkins
  template:
    metadata:
      labels:
        app: jenkins
    spec:
      hostAliases:
      - ip: "127.0.0.1"
        hostnames:
        - "mirrors.jenkins-ci.org"
      serviceAccountName: jenkins    # 指定我们前面创建的服务账号
      containers:
      - name: mirror                 # 创建 nginx 容器
        image: nginx:1.26.2
        ports:
        - containerPort: 80
        volumeMounts:
        - mountPath: /etc/nginx
          readOnly: true
          name: nginx-conf
      - name: jenkins
        image: jenkins/jenkins:lts-jdk17
        ports:
        - containerPort: 8080
          name: web
          protocol: TCP
        - containerPort: 50000
          name: agent
          protocol: TCP
        resources:
          limits:
            cpu: 1500m
            memory: "6Gi"
          requests:
            cpu: 1500m
            memory: "2048Mi"
        readinessProbe:
          httpGet:
            path: /login
            port: 8080
          initialDelaySeconds: 60
          timeoutSeconds: 5
          failureThreshold: 12
        volumeMounts:
        - name: jenkins-home
          mountPath: /var/jenkins_home
      volumes:
      - name: jenkins-home
        persistentVolumeClaim:
          claimName: jenkins-pvc
      - name: nginx-conf
        configMap:
          name: jenkins-mirror-conf
          items:
          - key: nginx.conf
            path: nginx.conf

---
apiVersion: v1
kind: Service
metadata:
  name: jenkins-service
  namespace: cicd-tool
spec:
  type: NodePort
  ports:
  - name: http
    port: 8080
    targetPort: 8080
    nodePort: 31400
  - name: agent
    port: 50000
    targetPort: 50000
    nodePort: 31401
  selector:
app: jenkins2.2. 部署 Jenkins-master
kubectl apply -f jenkins-master.yaml注意:k8s 默认的 svc nodePort 范围为30000-32767,如果指定的 nodePort 不在该范围则会报错。
修改这个范围的方式:
vim /etc/kubernetes/manifests/kube-apiserver.yaml

# 添加或修改配置参数
...
- --service-node-port-range=1024-65535
...
# 修改后 k8s 会自动重启这个静态 pod查看登录 Jenkins web 界面密码:
# 版本一:单容器查看方式
kubectl  exec -n cicd-tool -ti jenkins-6d5d7b5548-rtf4r  -- cat /var/jenkins_home/secrets/initialAdminPassword
# 版本二:多容器需要指定容器名称
kubectl exec -n cicd-tool -ti jenkins-6d5d7b5548-rtf4r -c jenkins -- cat /var/jenkins_home/secrets/initialAdminPassword2.3. jenkins 主从模式介绍
jenkins 主从模式英文简称为 Master-Slave,基于分而治之、解耦合的核心思想,将一庞大的工作拆分,master 主要负责基本管理、提供操作入口,例如流水线的创建与修改等,至于流水线的具体执行则交给 slave 去做。
为何要有主从模式呢?
因为日常构建 Jenkins 任务中,会经常出现下面的情况:
- 自动化测试需要消耗大量的CPU和内存资源,如果服务器上还有其他的服务,可能会造成卡顿或者宕机。
- Jenkins 平台项目众多,如果同一时间构建大量的任务,会出现多个任务抢占资源的情况。
Jenkins 提供了主从模式(Master-Slave)解决这个问题。我们可以为 Jenkins 配置多台 slave 从机,当 slave 从机和 Jenkins 服务建立连接之后,由 Jenkins 发指令给指定的 slave 从机运行任务,消耗的资源由 slave 从机去承担。
传统的 Jenkins 一主多从架构是有缺点的:
- 主 Master 发生单点故障时,整个流程都不可用了。
- 每个 Slave 的配置环境不一样,来完成不同语言的编译打包等操作,但是这些差异化的配置导致管理起来非常不方便,维护起来也是比较费劲。
- 资源有浪费,每台 Slave 可能是物理机或者虚拟机,当 Slave 处于空闲状态时也不会完全释放掉资源。或者有的 Slave 要运行的 job 出现排队等待,而有的 Slave 处于空闲状态。
所以我们将 Jenkins master 部署在 k8s 集群内来解决单点故障问题,同时配置动态创建 Slave Pod 来解决 2、3 问题。具体如何配置见下一小结。
2.4. 安装并配置 Jenkins 插件
2.4.1. 安装插件
首先可以选择安装 Jenkins 社区推荐的插件,然后我们还需要安装 kubernetes 插件,点击 Manage Jenkins -> Manage Plugins -> Available -> Kubernetes 安装即可。
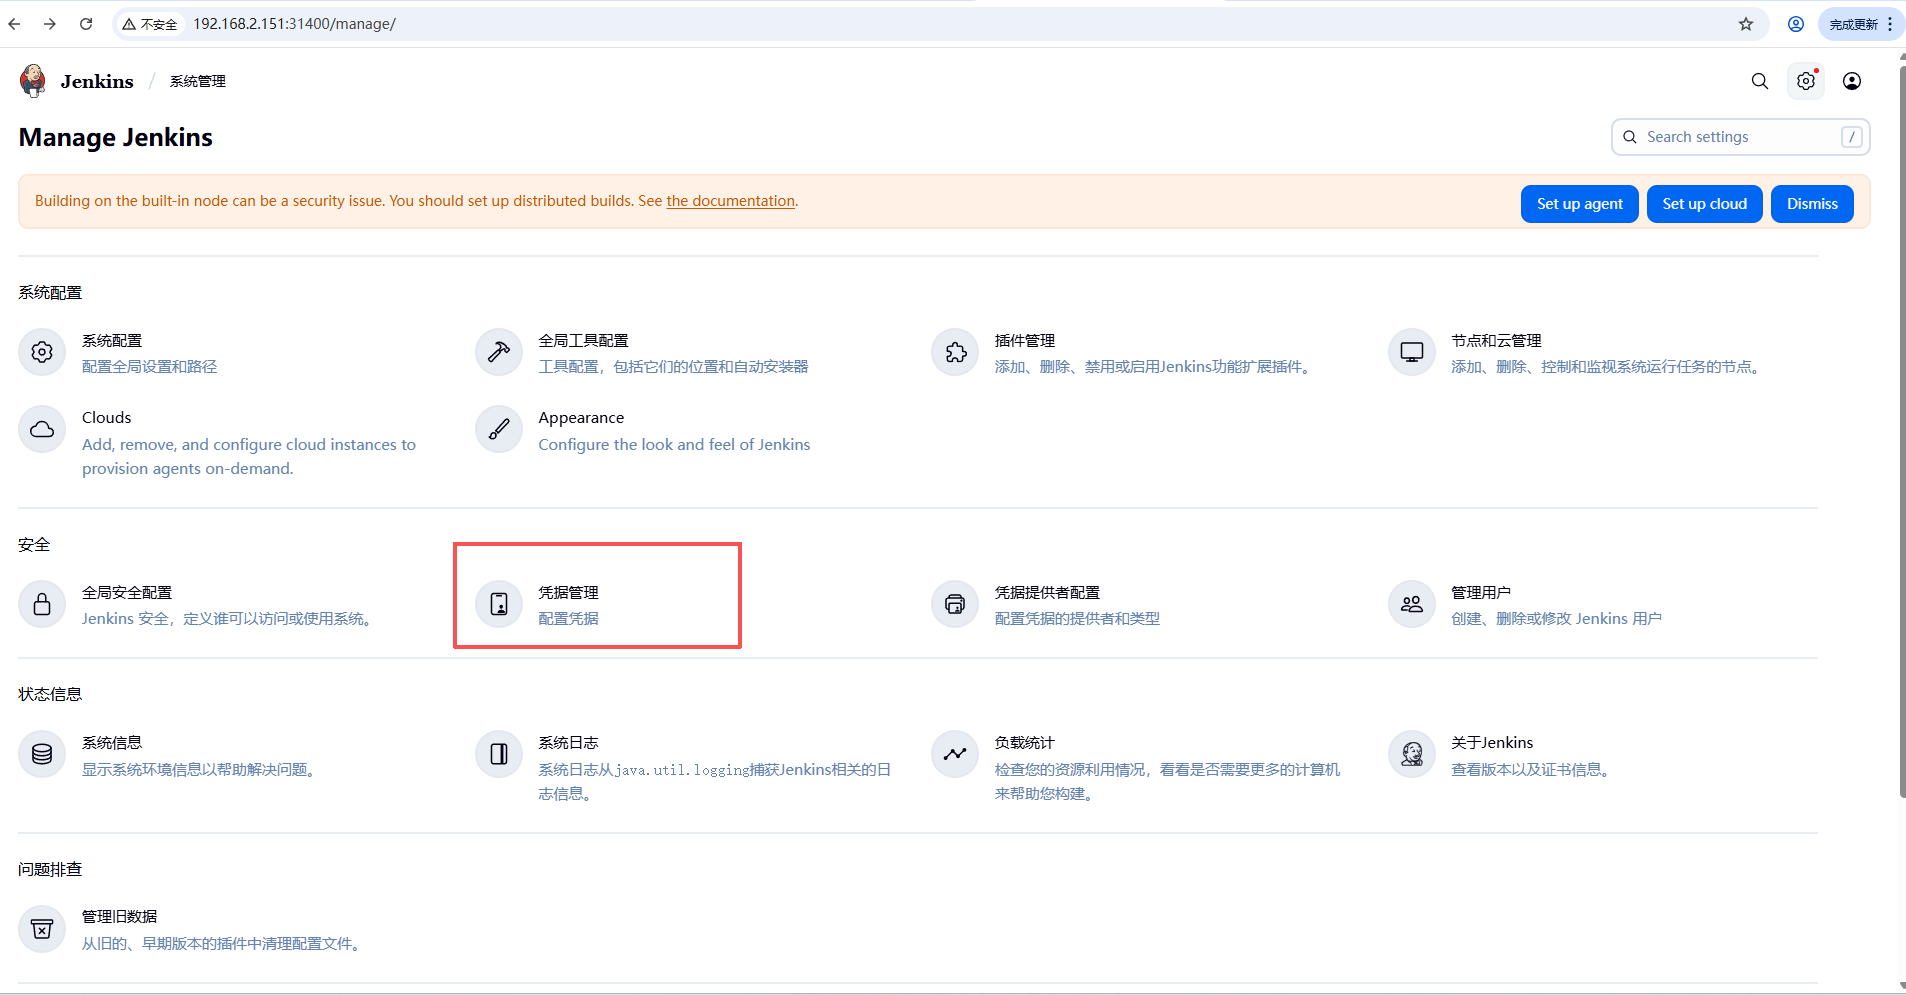
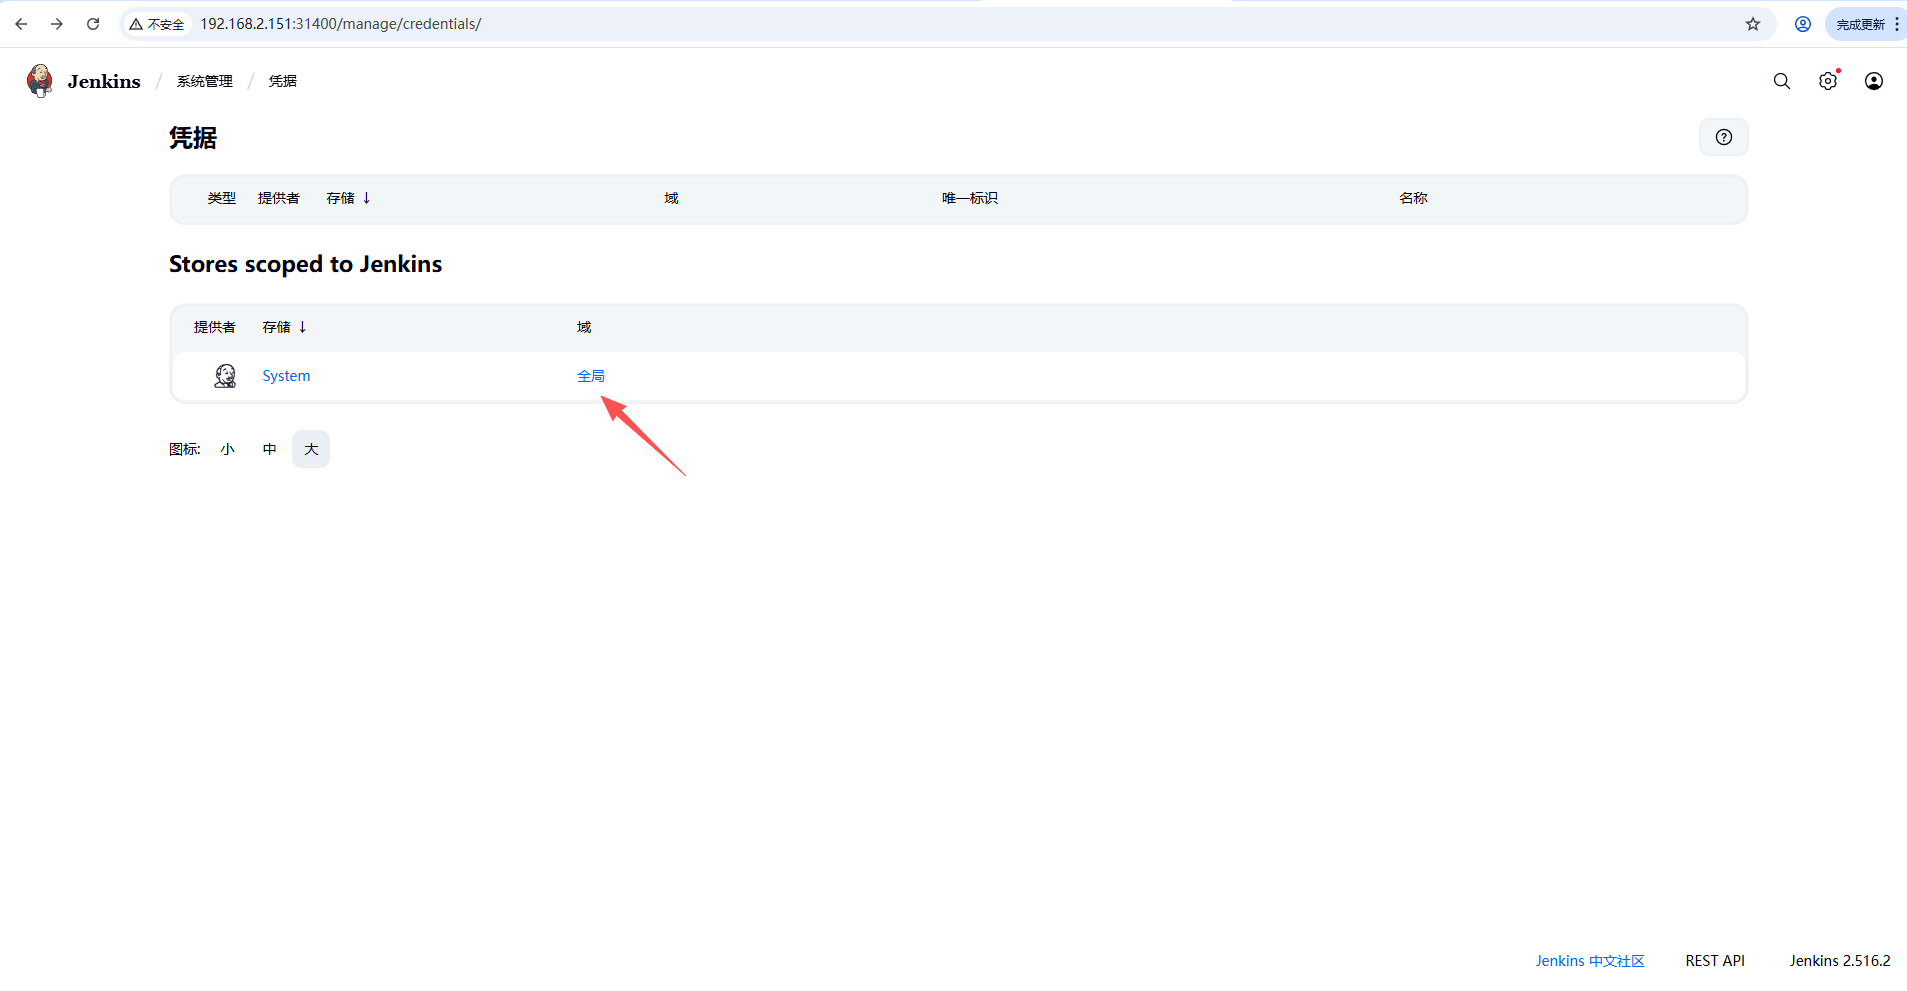
2.4.2. 准备 k8s 集群的凭证
制作一个用于 jenkins 对接 k8s 集群的凭证(注意:如果有多个集群的话这里是指运行 Slave Pod 的集群)。
# 在 kubectl 命令服务器上找到当初配置连接集群时的 config 文件,位置在 ~/.kube/config

# 执行命令
certificate_authority_data=$(awk -F': ' '/certificate-authority-data/{print $2}' ~/.kube/config)
client_certificate_data=$(awk -F': ' '/client-certificate-data/{print $2}' ~/.kube/config)
client_key_data=$(awk -F': ' '/client-key-data/{print $2}' ~/.kube/config)

echo "$certificate_authority_data" | base64 -d > ca.crt
echo "$client_certificate_data" | base64 -d > client.crt
echo "$client_key_data" | base64 -d > client.key

# 再生成 jenkins 使用的 PKCS12 格式的 cert.pfx 文件,需要设置密码,注意密码后期 jenkins 需要
openssl pkcs12 -export -out cert.pfx -inkey client.key -in client.crt -certfile ca.crt

Enter Export Password: 123456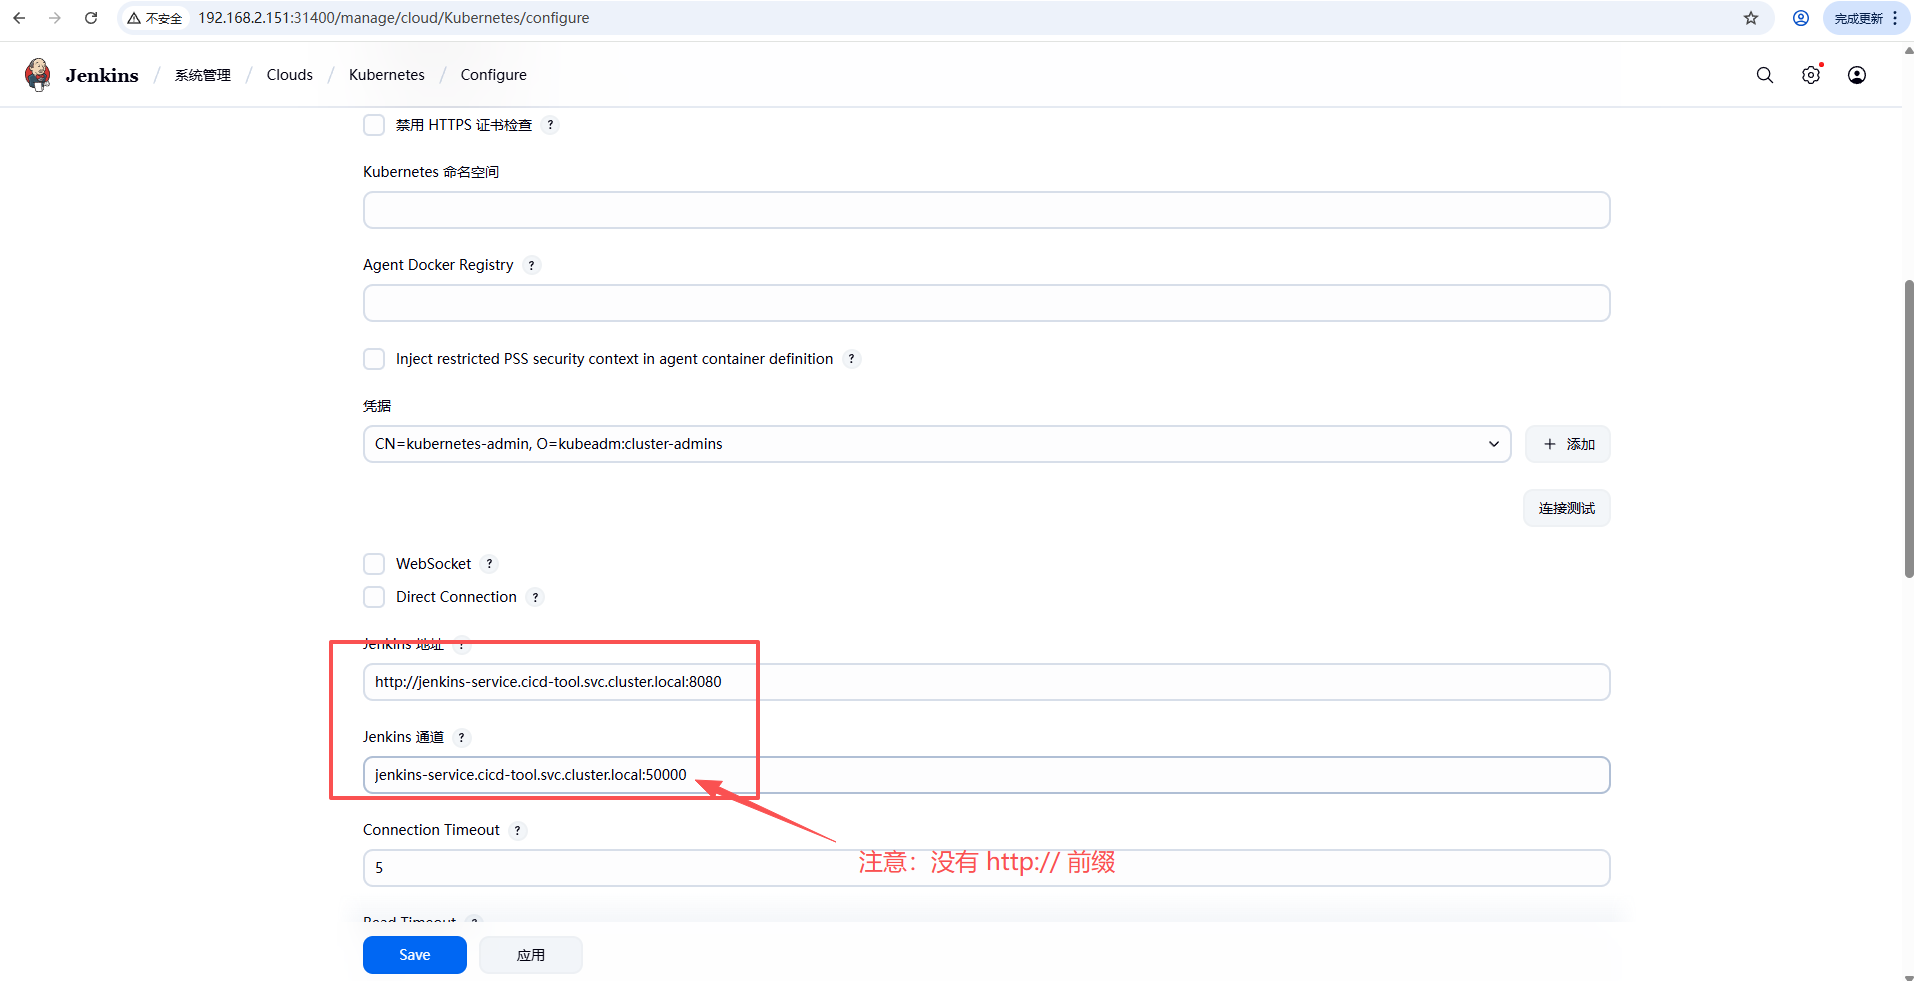
Verifying - Enter Export Password: 1234562.4.3. jenkins 连接 k8s
参考文档:https://www.cnblogs.com/fsdstudy/p/18263444
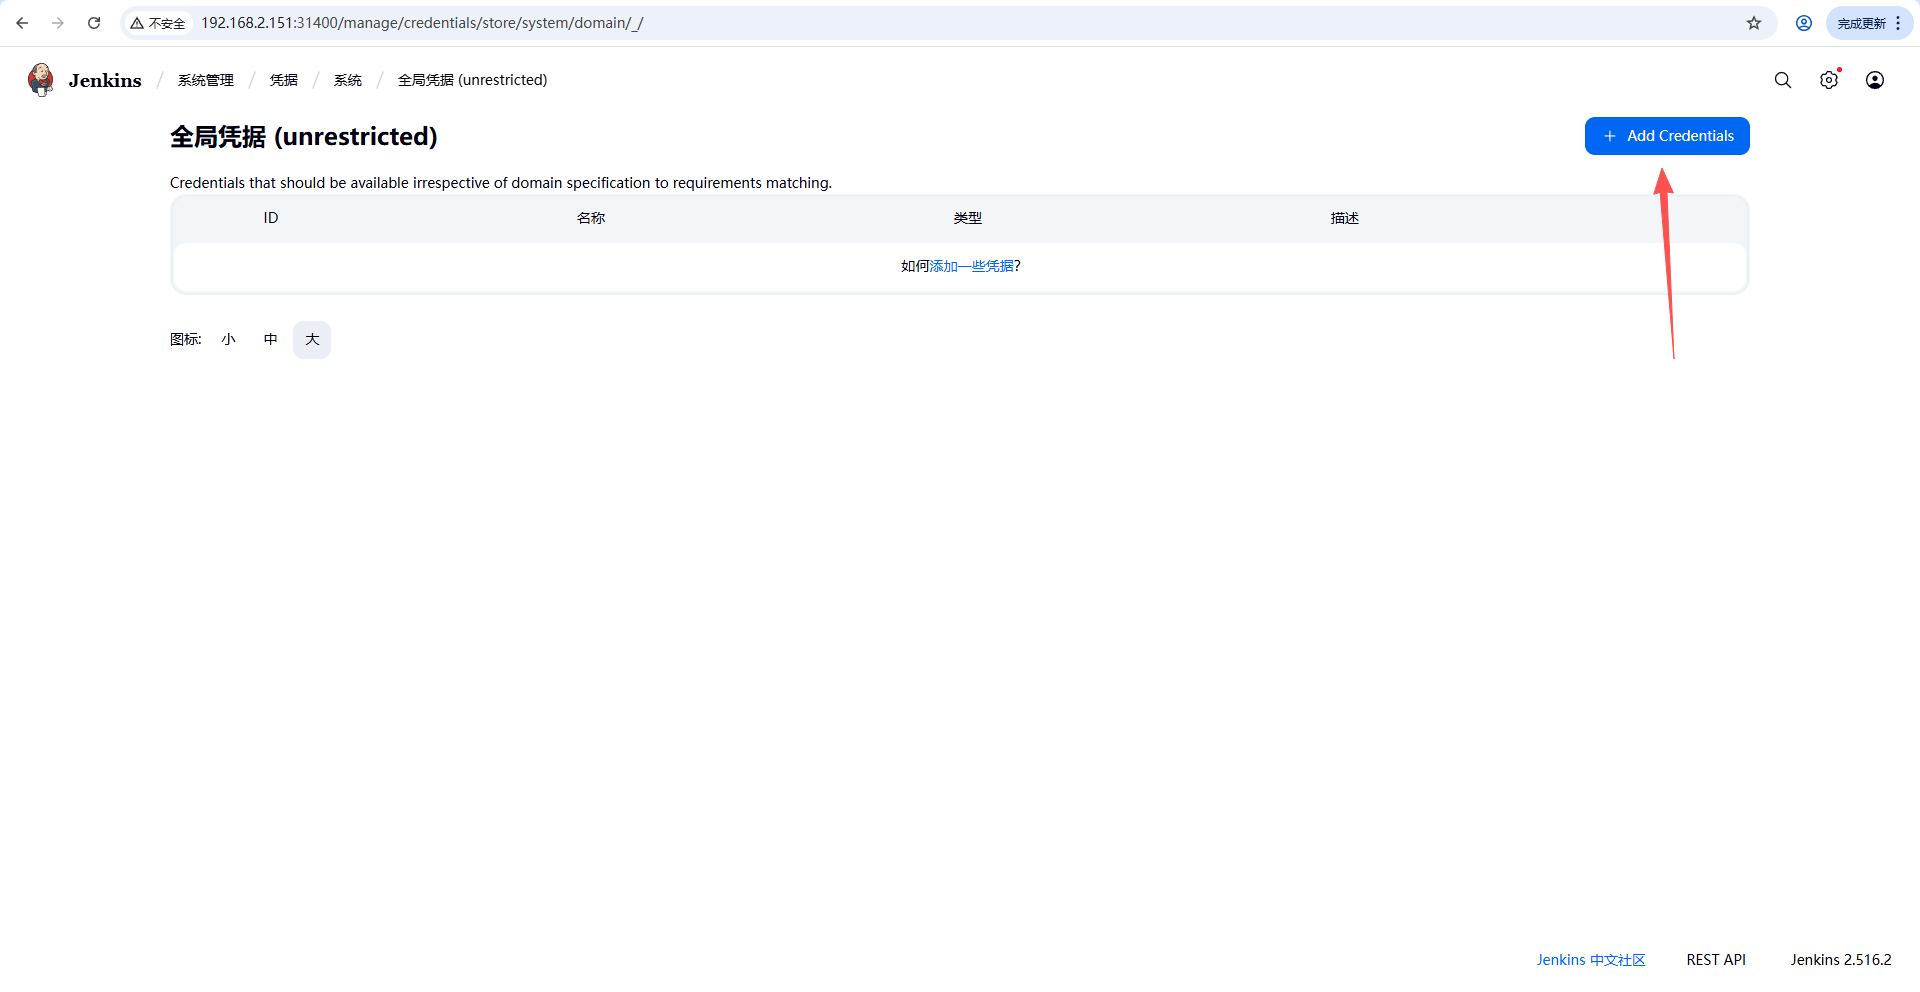
- 添加凭证
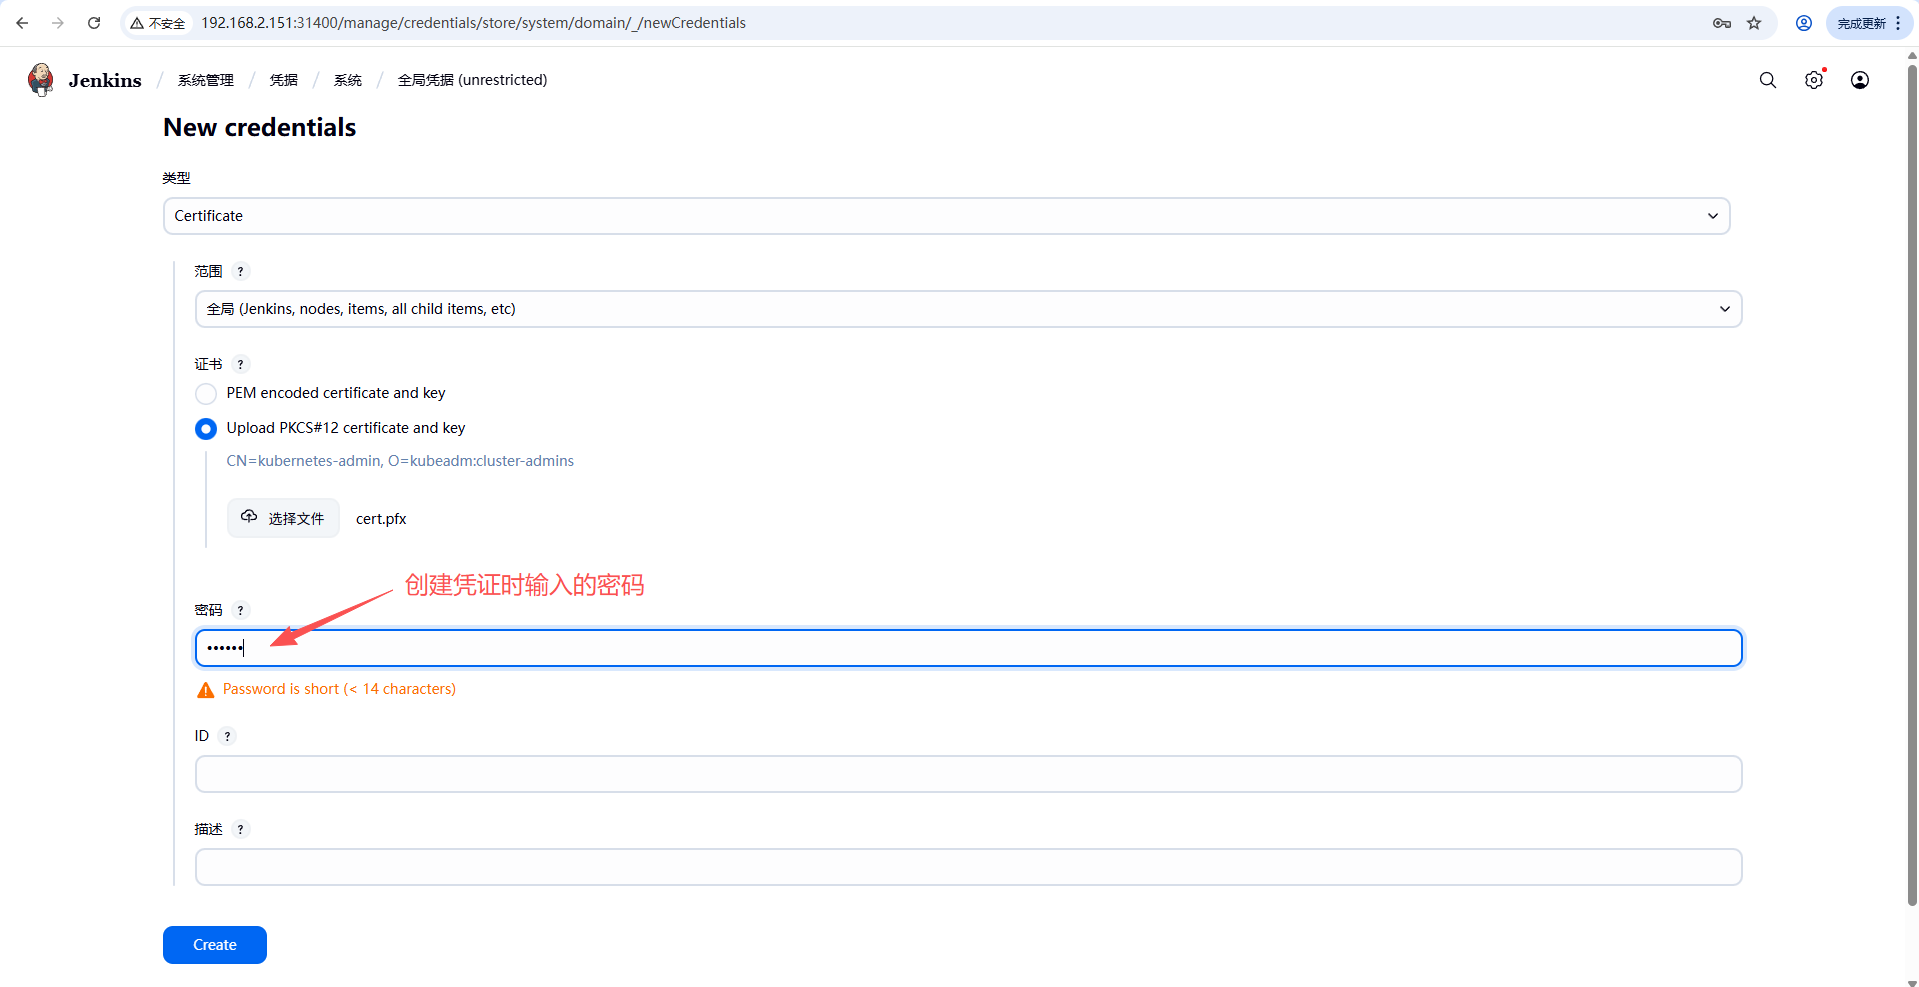
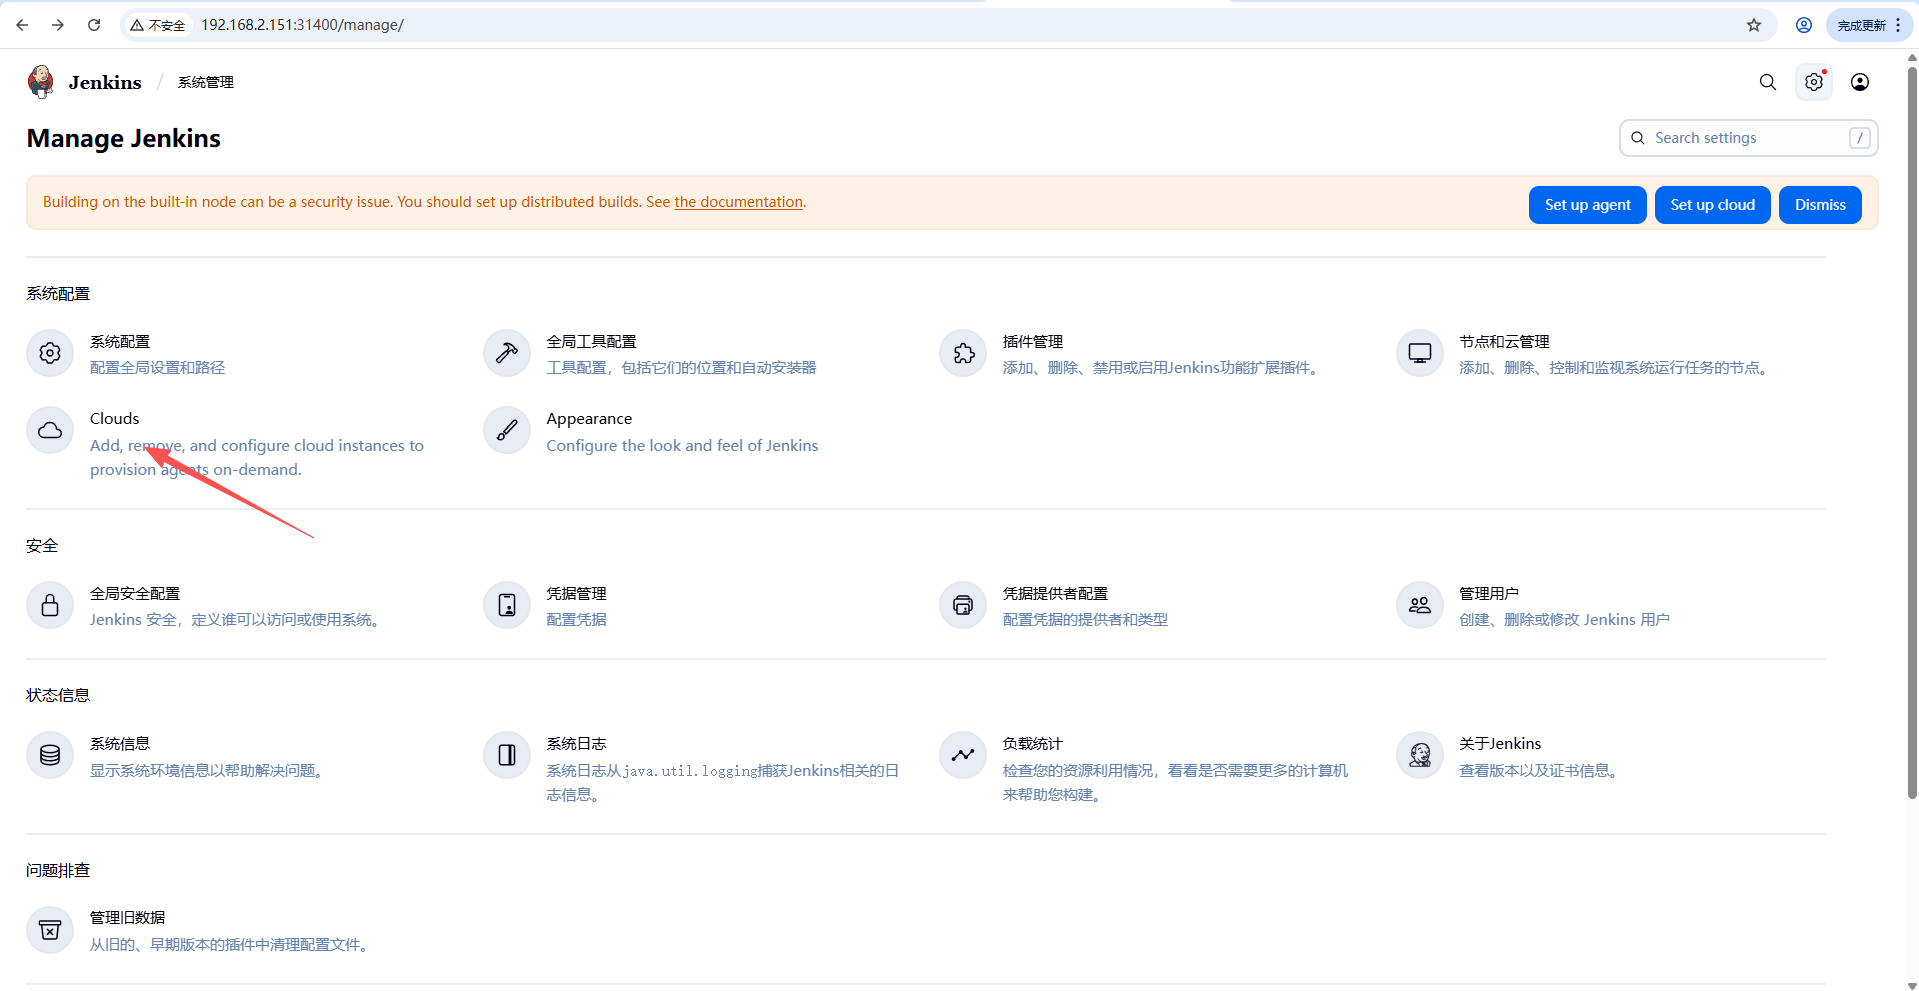
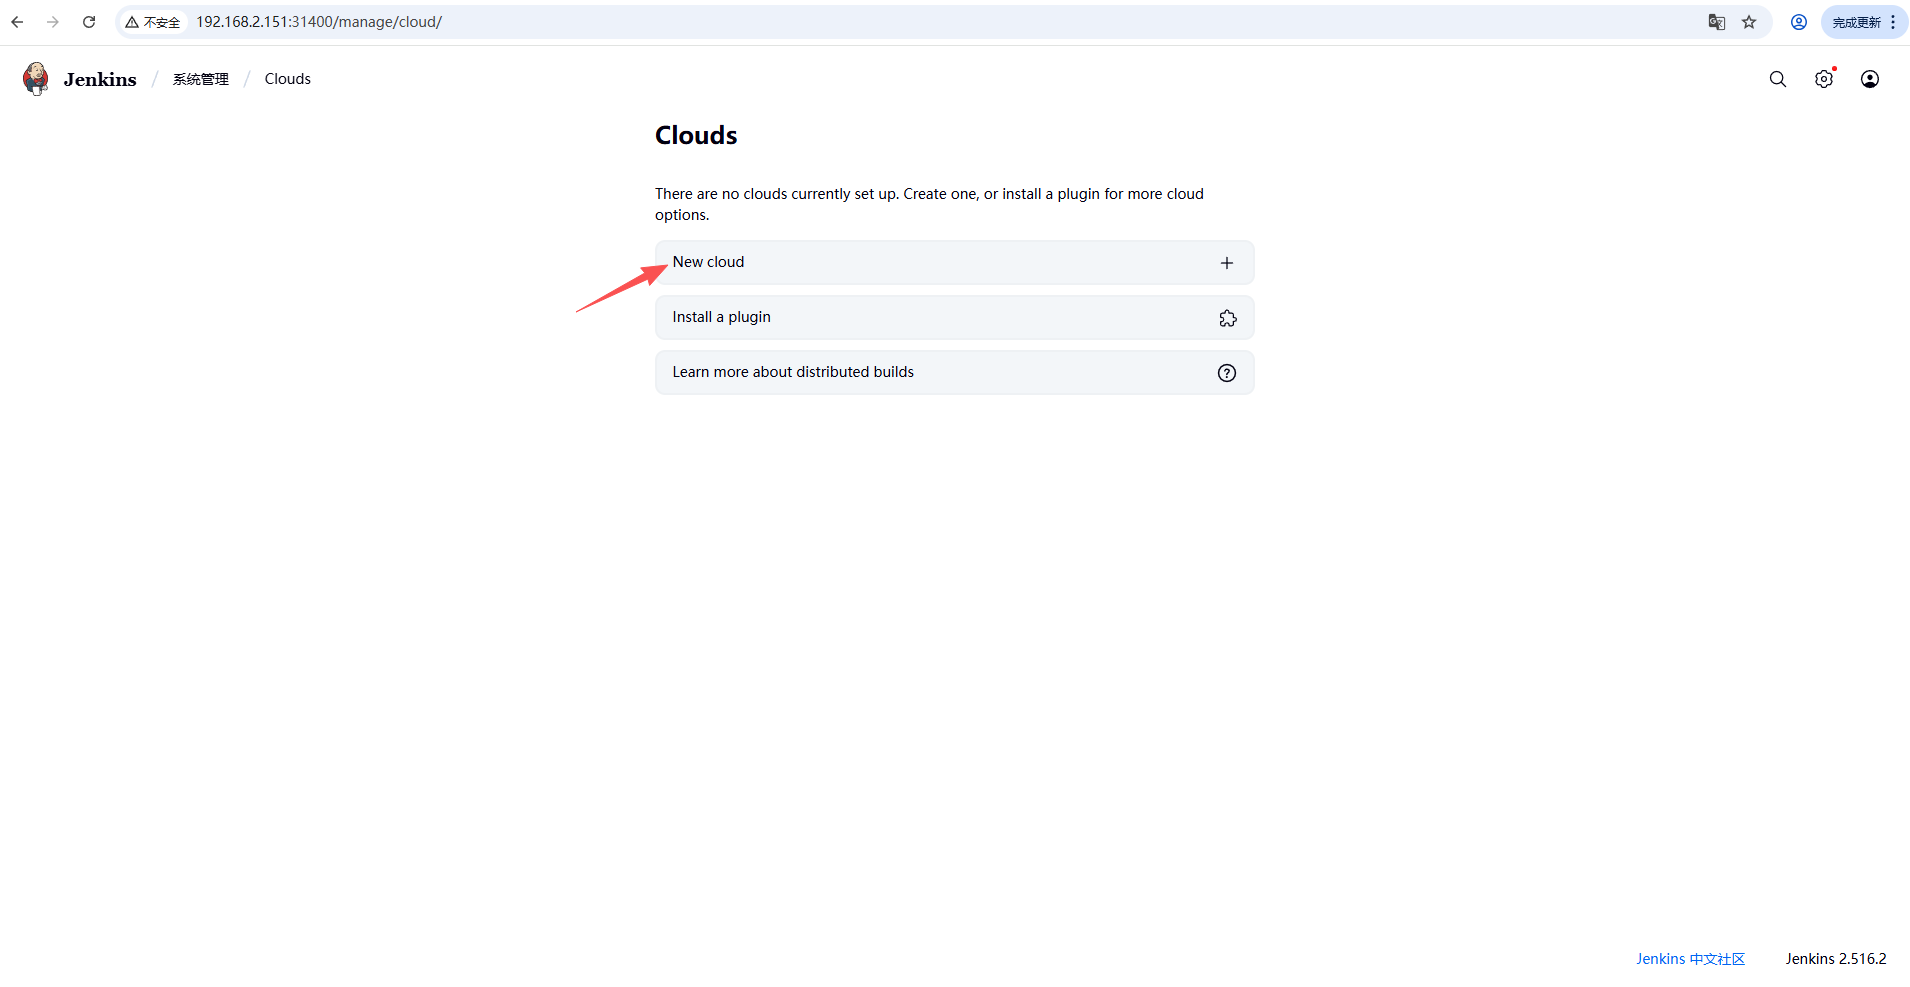
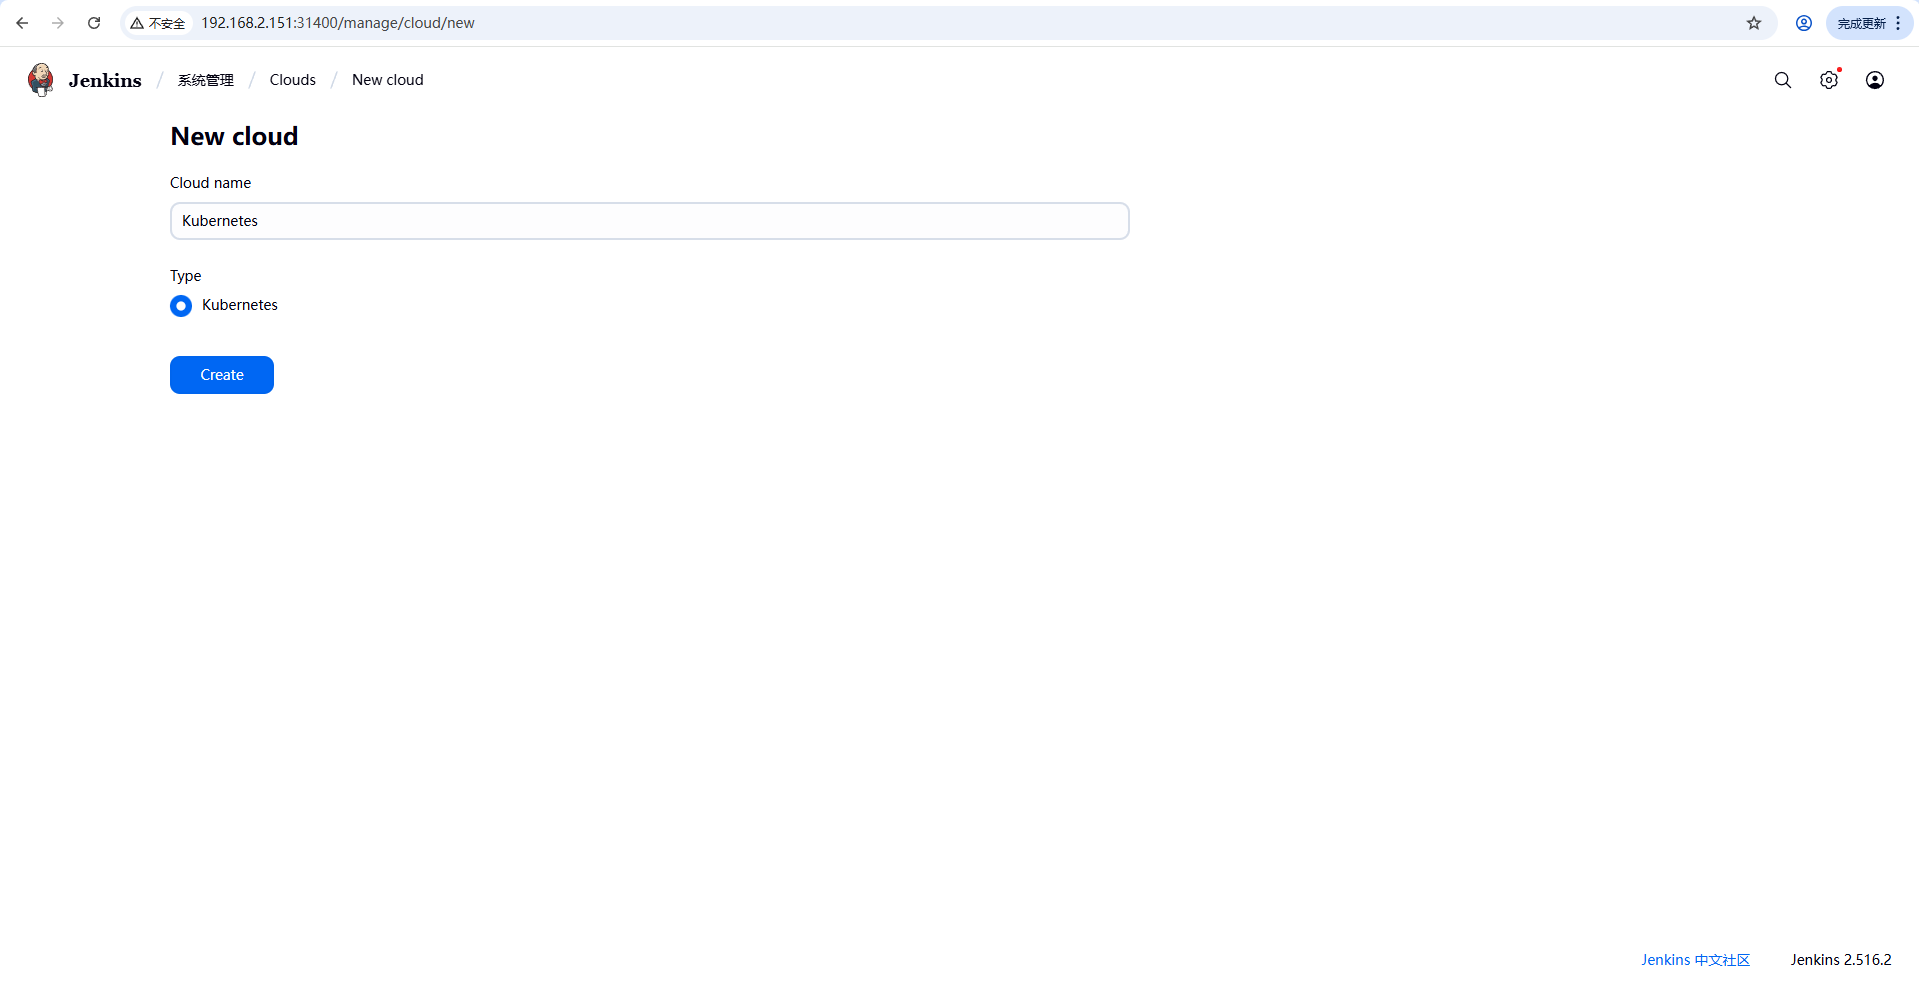
- 配置 jenkins 连接 k8s
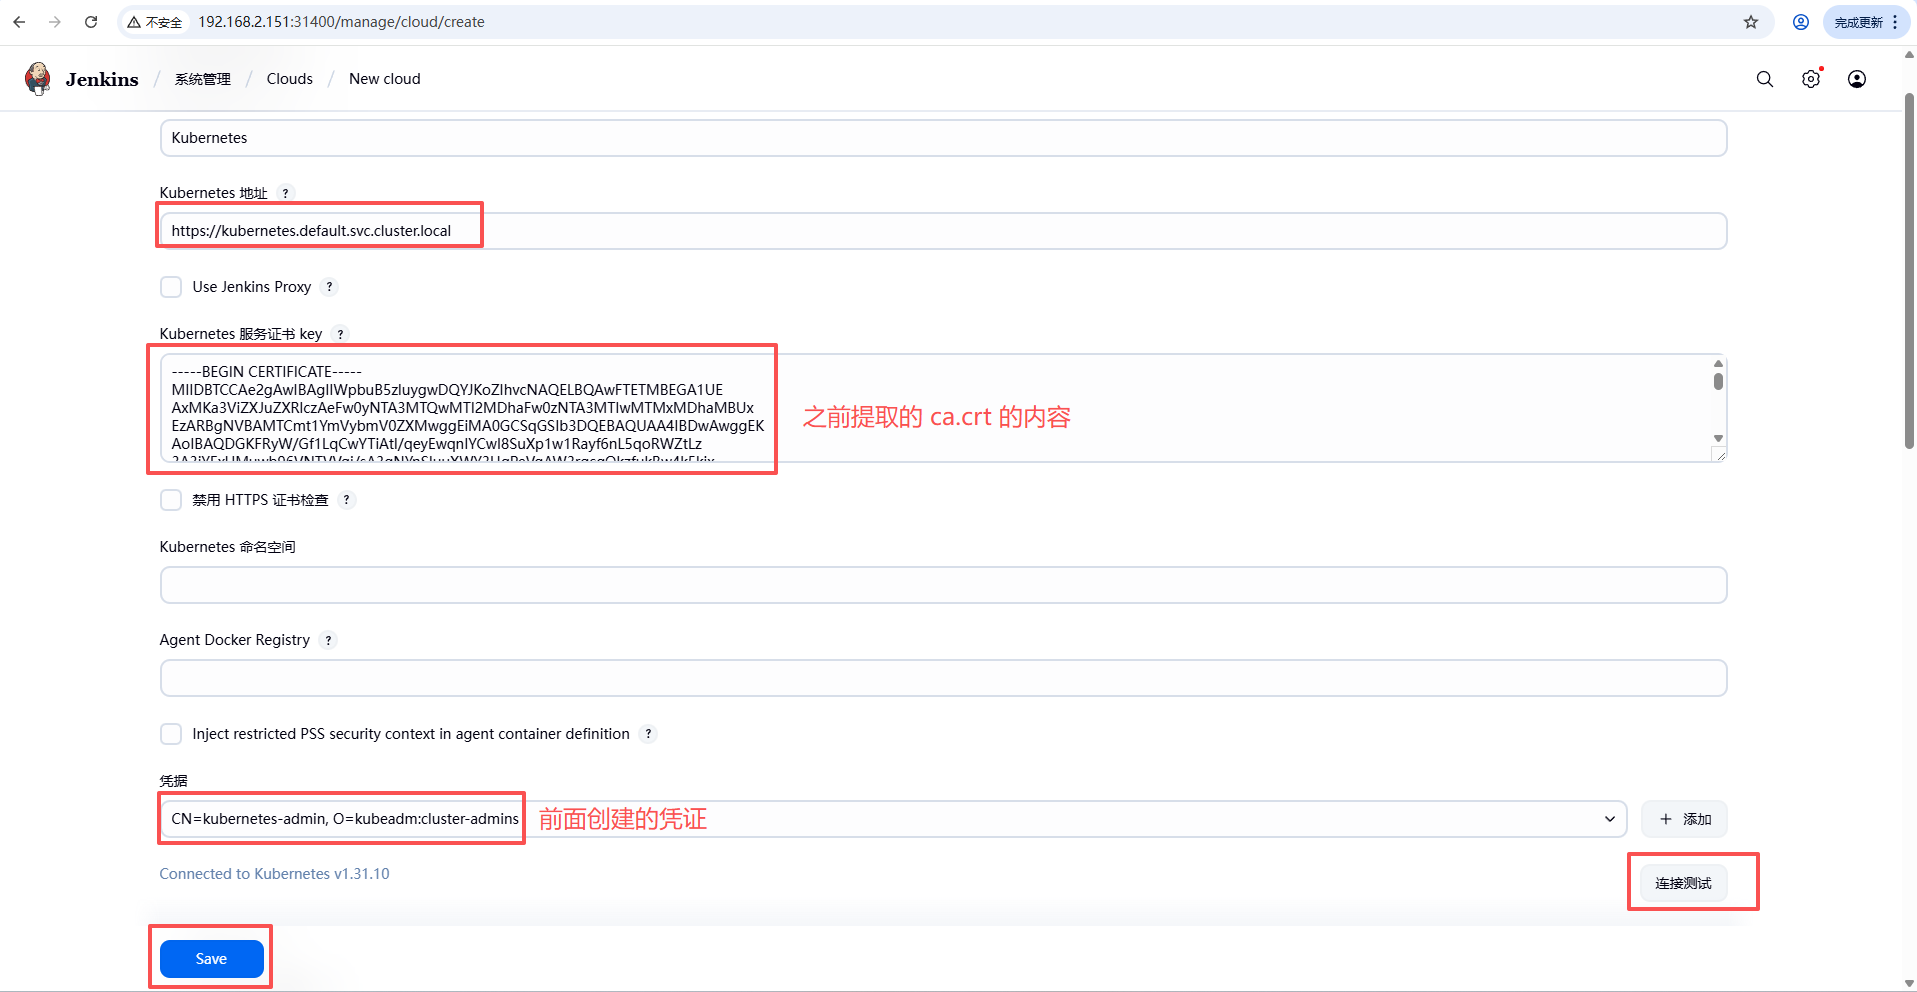
- 测试
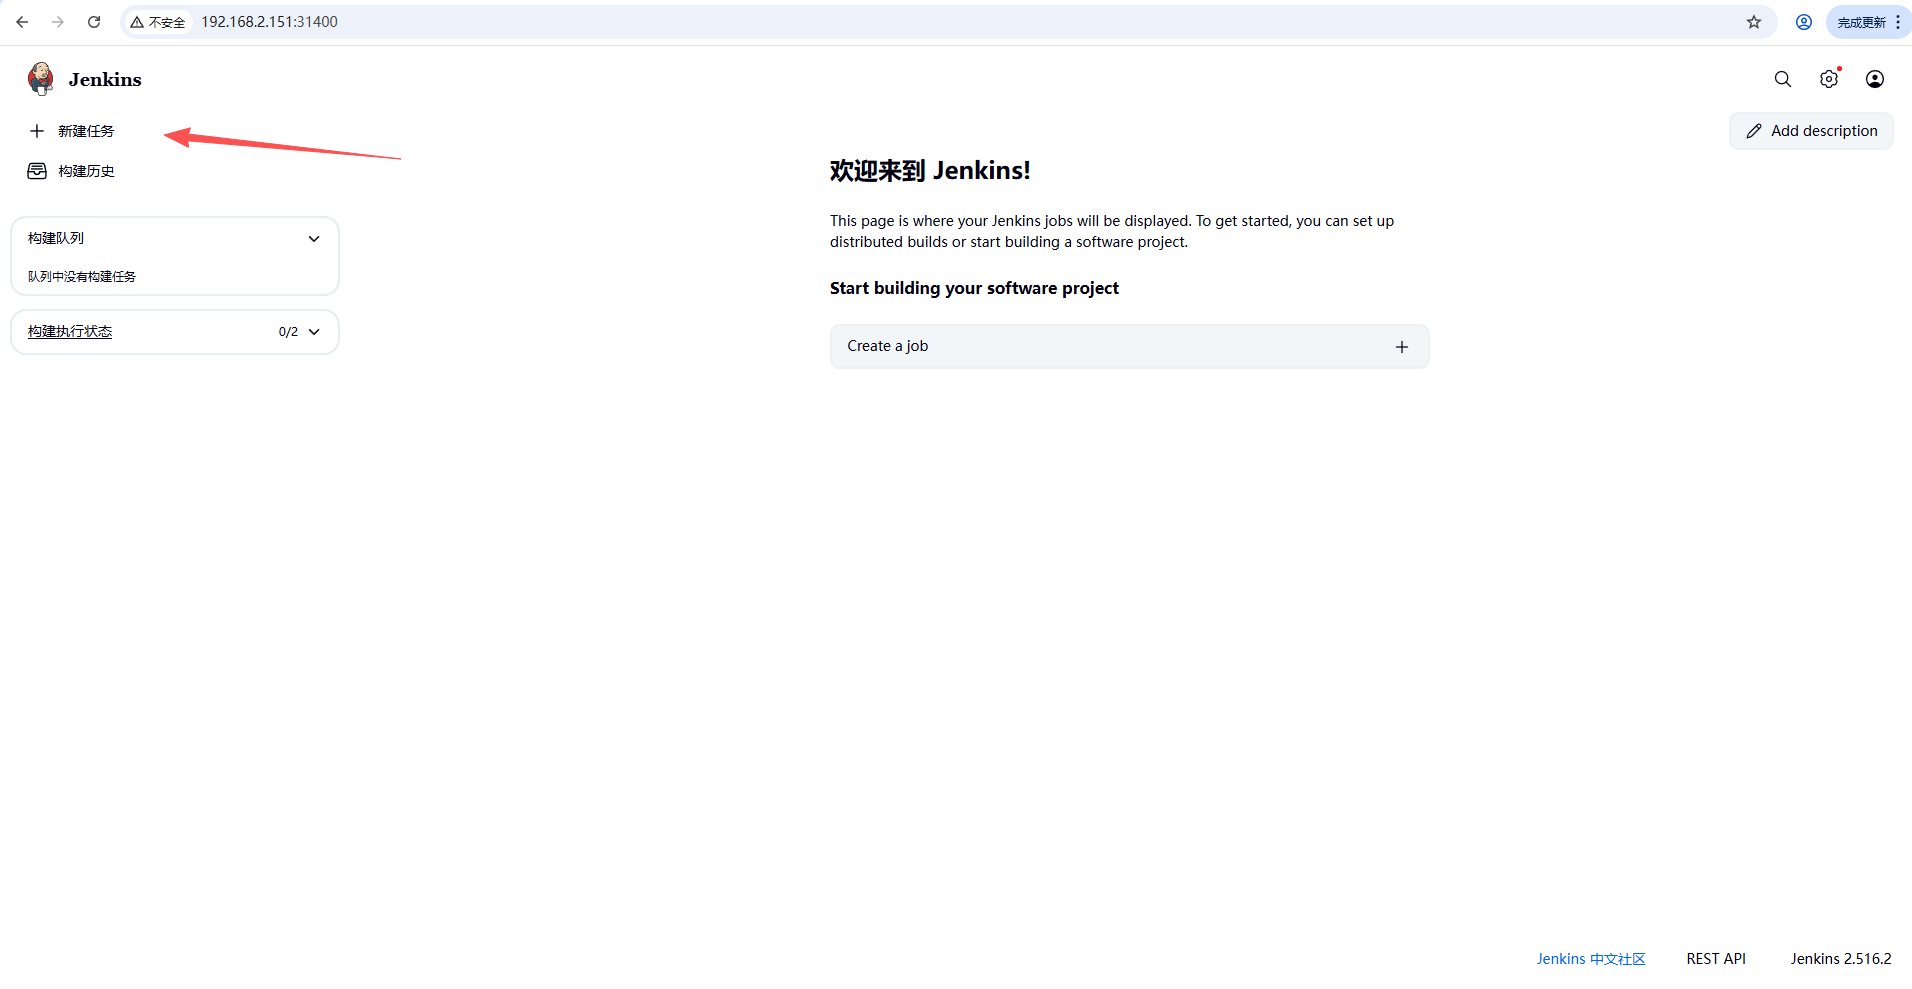
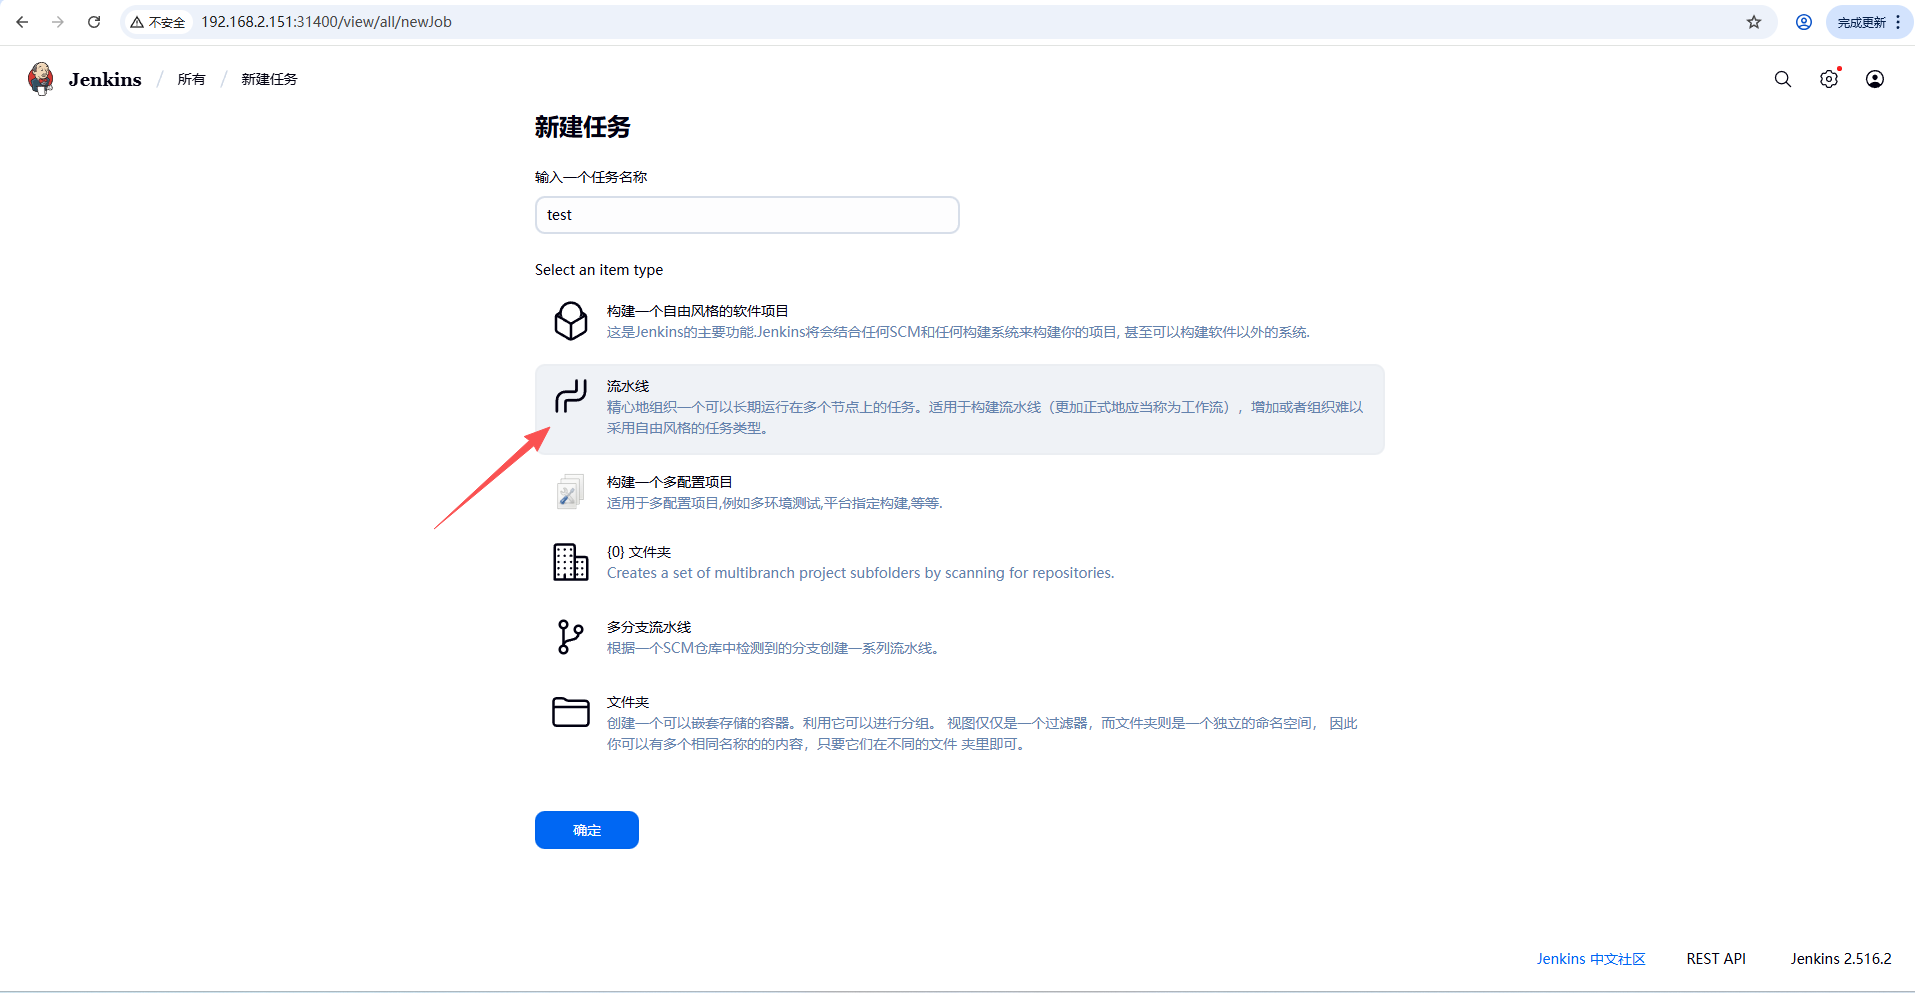
我们新建一个流水线,然后让他执行一些任务,看他能不能正确启动并连接。
测试代码:
pipeline {
    agent {
        kubernetes {
            cloud 'Kubernetes'
            showRawYaml true
            yaml """
apiVersion: v1
kind: Pod
metadata:
  labels:
    run: jenkins-agent
  name: jenkins-agent
  namespace: cicd-tool
spec:
  serviceAccountName: jenkins
  containers:
  - name: jnlp
    image: jenkins/inbound-agent
    args: ['\$(JENKINS_SECRET)', '\$(JENKINS_NAME)']
  - name: busybox
    image: busybox
    command:
    - cat
    tty: true
    imagePullPolicy: IfNotPresent
  dnsPolicy: ClusterFirst
  restartPolicy: Never
"""
        }
    }

    stages {
        stage('Hello') {
            steps {
                echo 'Hello World'
            }
        }
    }
}
如果不出问题的话就可以构建成功了。
Started by user admin
[Pipeline] Start of Pipeline
[Pipeline] podTemplate
[Pipeline] {
[Pipeline] node
Created Pod: Kubernetes cicd-tool/test-3-z7br9-jj8r8-5f82q
[PodInfo] cicd-tool/test-3-z7br9-jj8r8-5f82q
	Container [busybox] waiting [ContainerCreating] No message
	Container [jnlp] waiting [ContainerCreating] No message
	Pod [Pending][ContainersNotReady] containers with unready status: [jnlp busybox]
[PodInfo] cicd-tool/test-3-z7br9-jj8r8-5f82q
	Container [busybox] waiting [ContainerCreating] No message
	Container [jnlp] waiting [ContainerCreating] No message
	Pod [Pending][ContainersNotReady] containers with unready status: [jnlp busybox]
[PodInfo] cicd-tool/test-3-z7br9-jj8r8-5f82q
	Container [busybox] waiting [ContainerCreating] No message
	Container [jnlp] waiting [ContainerCreating] No message
	Pod [Pending][ContainersNotReady] containers with unready status: [jnlp busybox]
[PodInfo] cicd-tool/test-3-z7br9-jj8r8-5f82q
	Container [busybox] waiting [ContainerCreating] No message
	Container [jnlp] waiting [ContainerCreating] No message
	Pod [Pending][ContainersNotReady] containers with unready status: [jnlp busybox]
Agent test-3-z7br9-jj8r8-5f82q is provisioned from template test_3-z7br9-jj8r8
---
apiVersion: "v1"
kind: "Pod"
metadata:
  annotations:
    kubernetes.jenkins.io/last-refresh: "1757647646211"
    buildUrl: "http://jenkins-service.cicd-tool.svc.cluster.local:8080/job/test/3/"
    runUrl: "job/test/3/"
  labels:
    run: "jenkins-agent"
    jenkins: "slave"
    jenkins/label-digest: "66dcee5d1db08e04deb7e051da2bca2395e19081"
    jenkins/label: "test_3-z7br9"
    kubernetes.jenkins.io/controller: "http___jenkins-service_cicd-tool_svc_cluster_local_8080x"
  name: "test-3-z7br9-jj8r8-5f82q"
  namespace: "cicd-tool"
spec:
  containers:
  - args:
    - "$(JENKINS_SECRET)"
    - "$(JENKINS_NAME)"
    env:
    - name: "JENKINS_SECRET"
      value: "********"
    - name: "JENKINS_TUNNEL"
      value: "jenkins-service.cicd-tool.svc.cluster.local:50000"
    - name: "JENKINS_AGENT_NAME"
      value: "test-3-z7br9-jj8r8-5f82q"
    - name: "REMOTING_OPTS"
      value: "-noReconnectAfter 1d"
    - name: "JENKINS_NAME"
      value: "test-3-z7br9-jj8r8-5f82q"
    - name: "JENKINS_AGENT_WORKDIR"
      value: "/home/jenkins/agent"
    - name: "JENKINS_URL"
      value: "http://jenkins-service.cicd-tool.svc.cluster.local:8080/"
    image: "jenkins/inbound-agent"
    name: "jnlp"
    resources:
      requests:
        memory: "256Mi"
        cpu: "100m"
    volumeMounts:
    - mountPath: "/home/jenkins/agent"
      name: "workspace-volume"
      readOnly: false
  - command:
    - "cat"
    image: "busybox"
    imagePullPolicy: "IfNotPresent"
    name: "busybox"
    tty: true
    volumeMounts:
    - mountPath: "/home/jenkins/agent"
      name: "workspace-volume"
      readOnly: false
  dnsPolicy: "ClusterFirst"
  nodeSelector:
    kubernetes.io/os: "linux"
  restartPolicy: "Never"
  serviceAccountName: "jenkins"
  volumes:
  - emptyDir:
      medium: ""
    name: "workspace-volume"

Running on test-3-z7br9-jj8r8-5f82q in /home/jenkins/agent/workspace/test
[Pipeline] {
[Pipeline] stage
[Pipeline] { (Hello)
[Pipeline] echo
Hello World
[Pipeline] }
[Pipeline] // stage
[Pipeline] }
[Pipeline] // node
[Pipeline] }
[Pipeline] // podTemplate
[Pipeline] End of Pipeline
Finished: SUCCESS3. 部署 Gitlab
Gitlab 主要涉及到 3 个应用:Redis、Postgresql、Gitlab 核心程序。如果我们已经有可使用的 Redis 或 Postgresql 服务的话,那么直接配置在 Gitlab 环境变量中即可,如果没有的话就单独部署,我们这里为了展示 gitlab 部署的完整性,还是分开部署。
首先部署需要的 Redis 服务,对应的资源清单文件如下:
# gitlab-redis.yaml
apiVersion: apps/v1
kind: Deployment
metadata:
  name: redis
  namespace: cicd-tool
  labels:
    name: redis
spec:
  selector:
    matchLabels:
      name: redis
  template:
    metadata:
      name: redis
      labels:
        name: redis
    spec:
      containers:
      - name: redis
        resources:
          limits:
            cpu: 1
            memory: "2Gi"
          requests:
            cpu: 1
            memory: "2Gi"
        image: sameersbn/redis:latest
        imagePullPolicy: IfNotPresent
        ports:
        - name: redis
          containerPort: 6379
        volumeMounts:
        - mountPath: /var/lib/redis
          name: redis-data
        livenessProbe:
          exec:
            command:
            - redis-cli
            - ping
          initialDelaySeconds: 30
          timeoutSeconds: 5
        readinessProbe:
          exec:
            command:
            - redis-cli
            - ping
          initialDelaySeconds: 30
          timeoutSeconds: 1
      volumes:
      - name: redis-data
        persistentVolumeClaim:
          claimName: redis-pvc  # 引用PVC
---
apiVersion: v1
kind: PersistentVolumeClaim
metadata:
  name: redis-pvc
  namespace: cicd-tool
spec:
  accessModes:
    - ReadWriteOnce  # 单节点读写模式
  storageClassName: cfs-sc  # 使用cfs-sc存储类
  resources:
    requests:
      storage: 5Gi  # 请求5GB存储空间,根据实际需求调整
---
apiVersion: v1
kind: Service
metadata:
  name: redis
  namespace: cicd-tool
  labels:
    name: redis
spec:
  ports:
    - name: redis
      port: 6379
      targetPort: redis
  selector:
name: redis然后是数据库 Postgresql,对应的资源清单文件如下:
# gitlab-postgresql.yaml
apiVersion: v1
kind: PersistentVolumeClaim
metadata:
  name: postgresql-pvc
  namespace: cicd-tool
spec:
  storageClassName: cfs-sc
  accessModes:
  - "ReadWriteOnce"
  resources:
    requests:
      storage: 10Gi
---
apiVersion: apps/v1
kind: Deployment
metadata:
  name: postgresql
  namespace: cicd-tool
  labels:
    name: postgresql
spec:
  selector:
    matchLabels:
      name: postgresql
  template:
    metadata:
      name: postgresql
      labels:
        name: postgresql
    spec:
      containers:
      - name: postgresql
        resources:
          limits:
            cpu: 4
            memory: "4Gi"
          requests:
            cpu: 2
            memory: "2Gi"
        image: sameersbn/postgresql:14
        imagePullPolicy: IfNotPresent
        env:
        - name: DB_USER  # 数据库用户名 (gitlab)
          value: gitlab
        - name: DB_PASS  # 数据库密码 (passw0rd) - 注意:生产环境应使用 Secret
          value: passw0rd
        - name: DB_NAME  # 数据库名称 (gitlab_production)
          value: gitlab_production
        - name: DB_EXTENSION  # 启用 pg_trgm 扩展,用于 GitLab 的全文搜索功能
          value: pg_trgm
        - name: USERMAP_UID  # 设置容器内 PostgreSQL 进程的用户ID和组ID为 999(PostgreSQL 标准用户)
          value: "999"
        - name: USERMAP_GID
          value: "999"
        ports:
        - name: postgres
          containerPort: 5432
        volumeMounts:
        - mountPath: /var/lib/postgresql
          name: data
        readinessProbe:
          exec:
            command:
            - pg_isready
            - -h
            - localhost
            - -U
            - postgres
          initialDelaySeconds: 30
          timeoutSeconds: 1
      volumes:
      - name: data
        persistentVolumeClaim:
          claimName: postgresql-pvc
---
apiVersion: v1
kind: Service
metadata:
  name: postgresql
  namespace: cicd-tool
  labels:
    name: postgresql
spec:
  ports:
    - name: postgres
      port: 5432
      targetPort: postgres
  selector:
name: postgresqlgitlab 对应的资源清单:
# gitlab.yaml
apiVersion: v1
kind: PersistentVolumeClaim
metadata:
  name: gitlab-pvc
  namespace: cicd-tool
spec:
  storageClassName: cfs-sc
  accessModes:
  - "ReadWriteOnce"
  resources:
    requests:
      storage: 5Gi
---
apiVersion: apps/v1
kind: Deployment
metadata:
  name: gitlab
  namespace: cicd-tool
  labels:
    name: gitlab
spec:
  selector:
    matchLabels:
      name: gitlab
  template:
    metadata:
      name: gitlab
      labels:
        name: gitlab
    spec:
      initContainers:   # 在主容器启动前运行,修复存储卷的文件权限,确保 GitLab 用户(UID 1000)有读写权限。
      - name: fix-permissions
        image: busybox
        command: ["sh", "-c", "chown -R 1000:1000 /home/git/data"]
        securityContext:
          runAsUser: 0
        volumeMounts:
        - name: gitlab-data
          mountPath: /home/git/data
      containers:
      - name: gitlab
        resources:
          requests:
            cpu: 2
            memory: "2Gi"
          limits:
            cpu: 4
            memory: "4Gi"
        image: sameersbn/gitlab:16.4.3
        imagePullPolicy: IfNotPresent
        env:
        - name: TZ     # TZ 和 GITLAB_TIMEZONE:设置时区为北京/上海时间
          value: Asia/Shanghai
        - name: GITLAB_TIMEZONE
          value: Beijing
        - name: GITLAB_SECRETS_DB_KEY_BASE
          value: long-and-random-alpha-numeric-string
        - name: GITLAB_SECRETS_SECRET_KEY_BASE
          value: long-and-random-alpha-numeric-string
        - name: GITLAB_SECRETS_OTP_KEY_BASE
          value: long-and-random-alpha-numeric-string
        - name: GITLAB_ROOT_PASSWORD  # 设置管理员密码
          value: 'pingk@123456'
        - name: GITLAB_ROOT_EMAIL    # 设置管理员邮箱
          value: liaopingkai@163.com
        - name: GITLAB_HOST
          value: git.k8s.local            # 该域名会是你后面从gitlab里拉取项目的地址,需要添加解析才行
        - name: GITLAB_PORT               # 这个端口很重要,与svc对应好
          value: "31180"
        - name: GITLAB_SSH_PORT           # 这个端口很重要,与svc对应好
          value: "30022"
        - name: GITLAB_NOTIFY_ON_BROKEN_BUILDS
          value: "true"
        - name: GITLAB_NOTIFY_PUSHER
          value: "false"
        - name: GITLAB_BACKUP_SCHEDULE
          value: daily
        - name: GITLAB_BACKUP_TIME
          value: 01:00
        - name: DB_TYPE
          value: postgres
        - name: DB_HOST
          value: postgresql
        - name: DB_PORT
          value: "5432"
        - name: DB_USER
          value: gitlab
        - name: DB_PASS
          value: passw0rd
        - name: DB_NAME
          value: gitlab_production
        - name: REDIS_HOST
          value: redis
        - name: REDIS_PORT
          value: "6379"
        ports:
        - name: http
          containerPort: 80
        - name: ssh
          containerPort: 22
        volumeMounts:
        - mountPath: /home/git/data
          name: gitlab-data
        readinessProbe:
          httpGet:
            path: /
            port: 80
          initialDelaySeconds: 60
          timeoutSeconds: 10
      volumes:
      - name: gitlab-data
        persistentVolumeClaim:
          claimName: gitlab-pvc
---
apiVersion: v1
kind: Service
metadata:
  name: gitlab
  namespace: cicd-tool
  labels:
    name: gitlab
spec:
  type: NodePort
  ports:
    - name: http
      port: 80
      targetPort: http
      nodePort: 31180
    - name: ssh
      port: 22
      targetPort: ssh
      nodePort: 30022
  selector:
name: gitlabgitlab 配置说明:
关于gitlab.yaml中的一些环境变量的设置
        - name: GITLAB_ROOT_PASSWORD
          value: 'pingk@123456'
        - name: GITLAB_ROOT_EMAIL
          value: liaopingkai@163.com
        - name: GITLAB_HOST
          value: git.k8s.local
        - name: GITLAB_PORT
          value: "31180"
        - name: GITLAB_SSH_PORT
          value: "30022"

# 1、账号
账号名:root
密码为:pingk@123456

# 2、svc采用nodePort
web访问端口固定为80
SSH端口固定为30022

# 3、结合GITLAB_HOST:git.k8s.local
gitlab的web访问地址为:
    http://git.k8s.local:31180

gitlab的ssh访问地址为
    git.k8s.local:30022

需要为访问者添加指向该域名的地址解析

需要访问gitlab的有哪些,就在哪里添加解析
    1、一个是k8s集群,里面安装有jenkins需要访问gitlab
    2、另外一个是开发机
3、需要访问gitlab的web界面的用户k8 集群添加 dns 解析:
# 1、添加自定义解析
$ kubectl -n kube-system edit cm coredns
apiVersion: v1
data:
  Corefile: |
    .:53 {
        errors
        health {
           lameduck 5s
        }
        ready
        hosts {
          192.168.2.151 git.k8s.local  # 添加自定义解析
          fallthrough
        }
        kubernetes cluster.local in-addr.arpa ip6.arpa {
           pods insecure
           fallthrough in-addr.arpa ip6.arpa
           ttl 30
        }
        prometheus :9153
        forward . /etc/resolv.conf
        cache 30
        loop
        reload
        loadbalance
    }
kind: ConfigMap
metadata:
  creationTimestamp: "2022-07-12T02:37:57Z"
  managedFields:
  - apiVersion: v1
    fieldsType: FieldsV1
    fieldsV1:
      f:data: {}
    manager: kubeadm
    operation: Update
    time: "2022-07-12T02:37:57Z"

# 2、重启coredns
$ kubectl  -n kube-system scale deployment coredns --replicas=0
$ kubectl  -n kube-system scale deployment coredns --replicas=2

# 3、测试
# test.yaml
apiVersion: apps/v1
kind: Deployment
metadata:
  labels:
    app: test
  name: test
spec:
  replicas: 1
  selector:
    matchLabels:
      app: test
  strategy: {}
  template:
    metadata:
      labels:
        app: test
    spec:
      containers:
      - image: centos:7
        imagePullPolicy: IfNotPresent
        name: test
        command: ["sh","-c","tail -f /dev/null"]


$ kubectl apply -f test.yaml
$ kubectl exec -ti test-75bf4b886f-xkht7 -- sh
sh-4.2# ping git.k8s.local
PING git.k8s.local (192.168.2.151) 56(84) bytes of data.
64 bytes from git.k8s.local (192.168.2.151): icmp_seq=1 ttl=63 time=0.204 ms
64 bytes from git.k8s.local (192.168.2.151): icmp_seq=2 ttl=63 time=0.233 ms
64 bytes from git.k8s.local (192.168.2.151): icmp_seq=3 ttl=63 time=0.319 ms


# 注意:如果使用了 NodeLocal DNS 也需要在 NodeLocal DNS 添加k8s.local域处理
apiVersion: v1
data:
  Corefile: |
    cluster.local:53 {
        errors
        cache {
            success 9984 30
            denial 9984 5
        }
        reload
        loop
        bind 169.254.20.10
        forward . 10.96.0.10 {
            force_tcp
        }
        prometheus :9253
        health 169.254.20.10:8080
    }
    # 添加k8s.local域的处理
    k8s.local:53 {
        errors
        cache 30
        reload
        loop
        bind 169.254.20.10
        forward . 10.96.0.10 {
            force_tcp
        }
        prometheus :9253
    }
...在开发机上添加解析:
echo "192.168.2.151 git.k8s.local" | sudo tee -a /etc/hosts添加 SSH 推送或拉取存代码:
# 制作秘钥队
ssh-keygen  # 一路回车
cd ~/.ssh/
ls
id_rsa  id_rsa.pub
cat id_rsa.pub  # 查看公钥
ssh-rsa ssh-rsa AAAAB3NzaC1yc2EAAAADAQABAAABgQCFa+gzuq0Vy1JwWDykPTQ+/rP7K3k54xPOmqA96dicFgIu0oPtLLQ/Njgnqh9suMu/RawiGLw8g3g0aAuaMbcRsd/h29wleK2WmwTMTuNQY23xN8A8+lWPFrrCZ+4M8c99E9FJOh63JMoo1StZGBIyavxqKa4vJA3B5obNKcdjZ2+v+4w9M1g4+S1g4IE/BvjSLCBLFWbolgt38AqJguQh2smIlU7PjHZCMoVvD0cVCs9qDGYeim4ChPVNmjOIZN0hAwZhZmD9zjZQLAP6JT/Qn0RCZdOkJcK6C3dL2ARriNwEtFy2LnGesbDWasnkOQaZW1up0qo1hdMu34dpn4q92XWi8YdMM/RD7OLeRgwkMwxjA9VPR/ur3JnSq+rDQ8qlgVZbc0jkUR6oFi01w2UOvafg42hdejmqcCNucybeJgVGl3zTPdzKtrTfdQ0cFthaIOAJJD3P/jT8AeVilXYbSOmu/irhxhD0/J/phOgj7NowcAZDg5JMQKnHw4Qie5c= admin@k8s-master-01

# 复制公钥到 gitlab使用 SSH 推送或拉取存代码:
yum install git -y

# 先在 GitLab 中创建一个 test 项目
git clone ssh://git@git.k8s.local:30022/root/test.git
cd test/

git config --global user.name "root"
git config --global user.email "liaopingkai@163.com"


cat > test.sh << EOF
echo ok > /tmp/a.log
sleep 100000
EOF

git add .
git commit -m "第一次提交"
git push origin main4. 部署 harbor
4.1. 下载
# 添加仓库
helm repo add harbor https://helm.goharbor.io

# 查看添加的Chart
helm repo list

helm pull harbor/harbor --untar   # 下载Chart包
cd harbor 4.2. 配置 values-example.yaml
# values-example.yaml
expose:
  type: nodePort         # 我这没有Ingress环境,使用NodePort的服务访问方式。
  tls:
    enabled: false    # 关闭tls安全加密认证(如果开启需要配置证书)
  nodePort:
    name: harbor
    ports:
      http:
        port: 80
        nodePort: 30002

externalURL: http://192.168.2.151:30002   # 使用nodePort且关闭tls认证,则此处需要修改为http协议和expose.nodePort.ports.http.nodePort指定的端口号,IP即为kubernetes的节点IP地址

# 持久化存储配置部分
persistence:
  enabled: true   # 开启持久化存储
  resourcePolicy: "keep"
  persistentVolumeClaim:        # 定义Harbor各个组件的PVC持久卷部分
    registry:          # registry 组件(持久卷)配置部分
      existingClaim: ""
      storageClass: "cfs-sc"  # StorageClass 名称,其它组件同样配置
      subPath: ""
      accessMode: ReadWriteOnce
      size: 5Gi
    jobservice:
      jobLog:
        existingClaim: ""
        storageClass: "cfs-sc"
        subPath: ""
        accessMode: ReadWriteOnce
        size: 1Gi
    database:        # PostgreSQl数据库组件(持久卷)配置部分
      existingClaim: ""
      storageClass: "cfs-sc"
      subPath: ""
      accessMode: ReadWriteOnce
      size: 1Gi
    redis:    # Redis缓存组件(持久卷)配置部分
      existingClaim: ""
      storageClass: "cfs-sc"
      subPath: ""
      accessMode: ReadWriteOnce
      size: 1Gi
    trivy:         # Trity漏洞扫描插件(持久卷)配置部分
      existingClaim: ""
      storageClass: "cfs-sc"
      subPath: ""
      accessMode: ReadWriteOnce
      size: 5Gi
  imageChartStorage:
    disableredirect: false
    type: filesystem
    filesystem:
      rootdirectory: /storage

harborAdminPassword: "Harbor12345"   # admin初始密码

metrics:
  enabled: true  # 是否启用监控组件(可以使用Prometheus监控Harbor指标),非必须操作
  core:
    path: /metrics
    port: 8001
  registry:
    path: /metrics
    port: 8001
  jobservice:
    path: /metrics
    port: 8001
  exporter:
    path: /metrics
    port: 8001

  ## 如果你使用 Prometheus Operator,则配置 serviceMonitor 部分
  serviceMonitor:
    enabled: true  # 启用 ServiceMonitor 的创建
    additionalLabels: {}
    # 可选:抓取间隔。如果不设置,则使用 Prometheus 的默认全局配置。
    interval: 30s
    # 可选:指标重新标记配置(高级用法)
    metricRelabelings: []
    # 可选:目标重新标记配置(高级用法)
relabelings: []部署:
helm install harbor . -f values-example.yaml -n cicd-tool4.3. 登录镜像仓库
我们这里的 harbor 没有使用 tls 所以需要为容器运行时添加信任。
Docker:
cat /etc/docker/daemon.json

{
"exec-opts": ["native.cgroupdriver=systemd"],
"insecure-registries":["192.168.2.151:30002"], # 将 192.168.2.151:30002 这个镜像仓库地址添加到“不安全注册表”列表中。
"registry-mirrors":["https://reg-mirror.qiniu.com/"],
"live-restore":true
}

# 重启
systemctl daemon-reload
systemctl restart docker

# 登录镜像仓库
docker login -u admin -p Harbor12345 http://192.168.2.151:30002/containerd:
mkdir -p /etc/containerd/certs.d/192.168.2.151:30002

tee /etc/containerd/certs.d/192.168.2.151:30002/hosts.toml > /dev/null << 'EOF'
# 服务器地址
server = "http://192.168.2.151:30002"

# 主机配置
[host."http://192.168.2.151:30002"]
  # 支持的操作能力
  capabilities = ["pull", "resolve", "push"]
  # 跳过 TLS 证书验证(关键配置)
  skip_verify = true
  # 使用 HTTP 而不是 HTTPS(关键配置)
  plain-http = true
EOF

# 重启 Containerd 服务
systemctl restart containerd

# 登录镜像仓库
nerdctl login -u admin -p Harbor12345 http://192.168.2.151:30002/如果是 push 操作,或者是拉取私有仓库的镜像都需要登录。
4.4. 测试
nerdctl pull centos:7

# 推送到自己的镜像仓库,需要在 harbor 中创建一个项目,这里是 online
nerdctl tag centos:7 192.168.2.151:30002/online/centos:7

nerdctl push 192.168.2.151:30002/online/centos:7
5. 打通 Jenkins 与 GitLab
这里以一个 go 程序为例,大致流程如下
- 在 gitlab 里创建一个项目,该项目用来管理 go 程序,创建完毕后记录该项目的 http 或 ssh 链接信息。
- 在 jenkins 里创建一个 go 的流水线构建触发器,定义一个随机字符串作为 token 值,并选择 Pipeline script from SCM,在 SCM 配置好代码仓库的链接信息。
- 在 gitlab 里配置 webhook 在 gitlab 里配置好 webhook 执行 jenkins 的地址,地址里包含在 jenkins 里生成的 token值。
- 编写一个名为 Jenkinsfile 的文件,把 pipeline 的代码写到里面,然后扔给开发,开发人员会将该文件放到它的项目根目录下。
- go 开发人员通过自己的开发机上传 go 项目代码(该项目根目录下包含一个名为 Jenkinsfile 的文件)到 gitlab 中的仓库里,然后会按照 Jenkinsfile 的规定触发一整套流程。
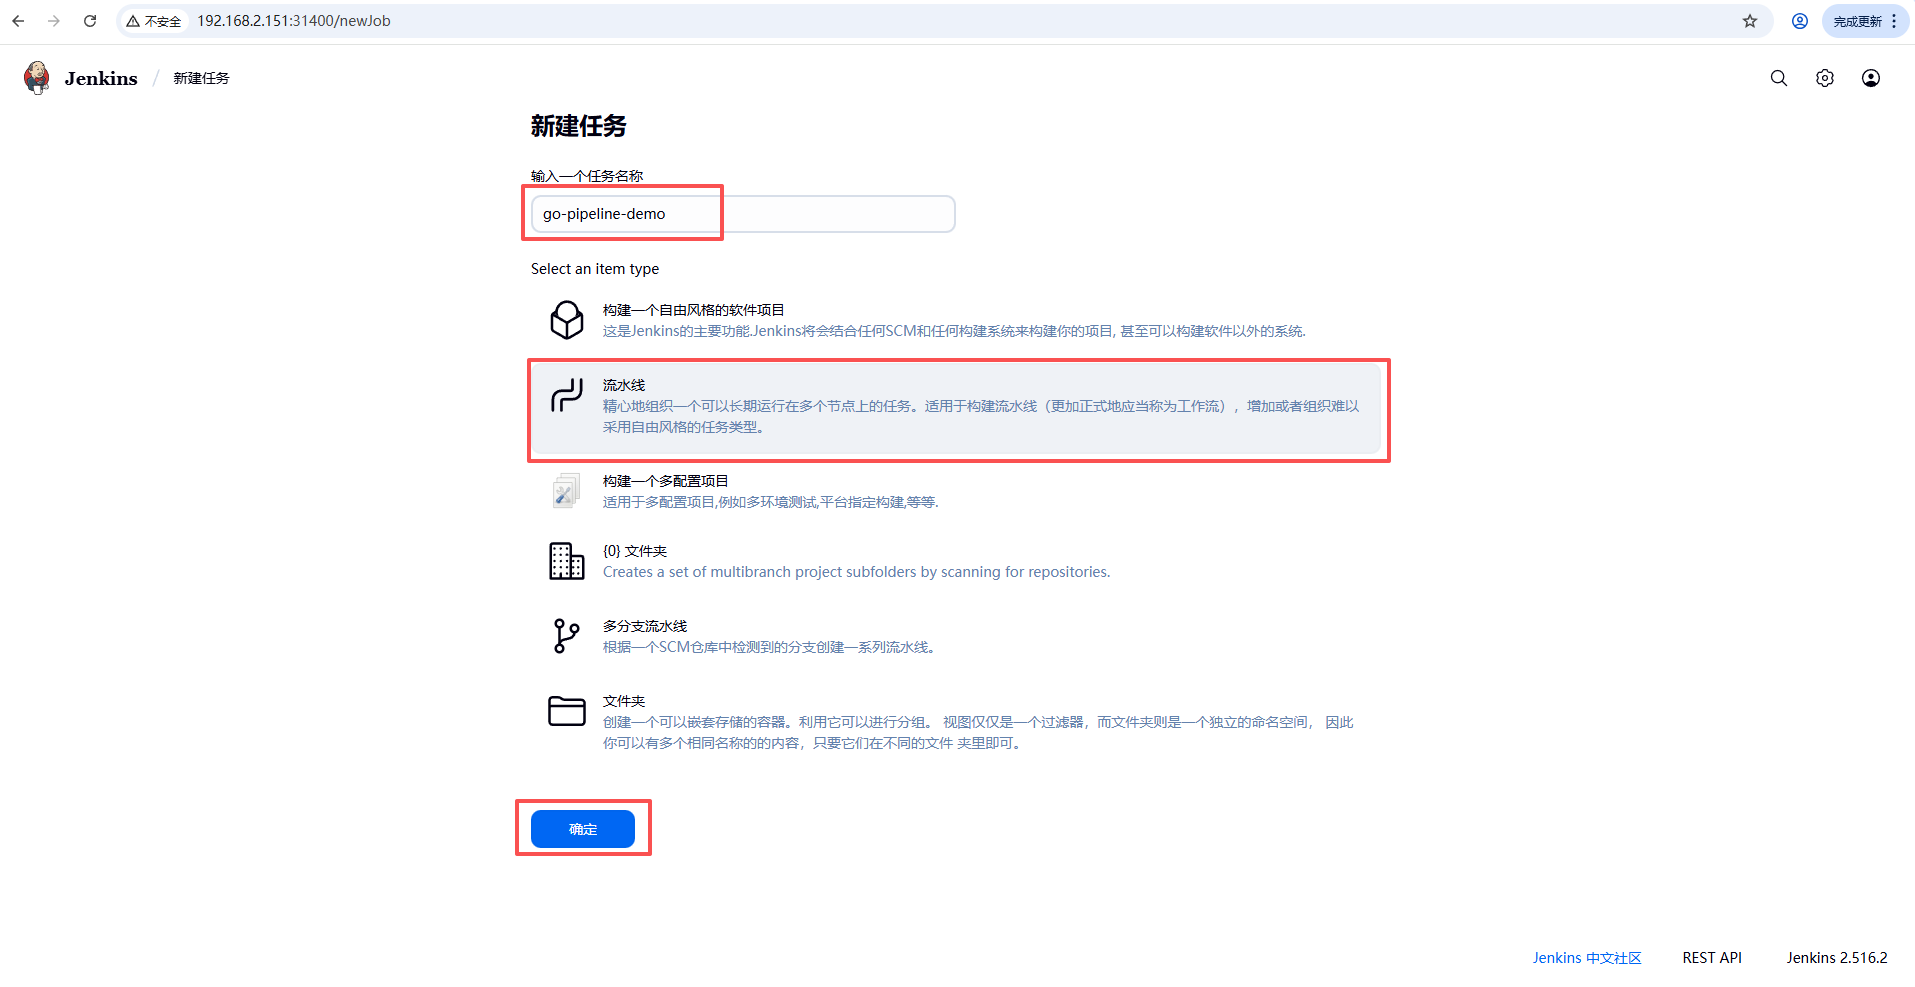
5.1. 在 gitlab 里创建一个项目
# 前面已经创建过了,项目名为 test
# 克隆地址
ssh://git@git.k8s.local:30022/root/test.git
http://git.k8s.local:31180/root/test.git5.2. 在 Jenkins 里创建一个 go 程序的流水线
触发器配置:
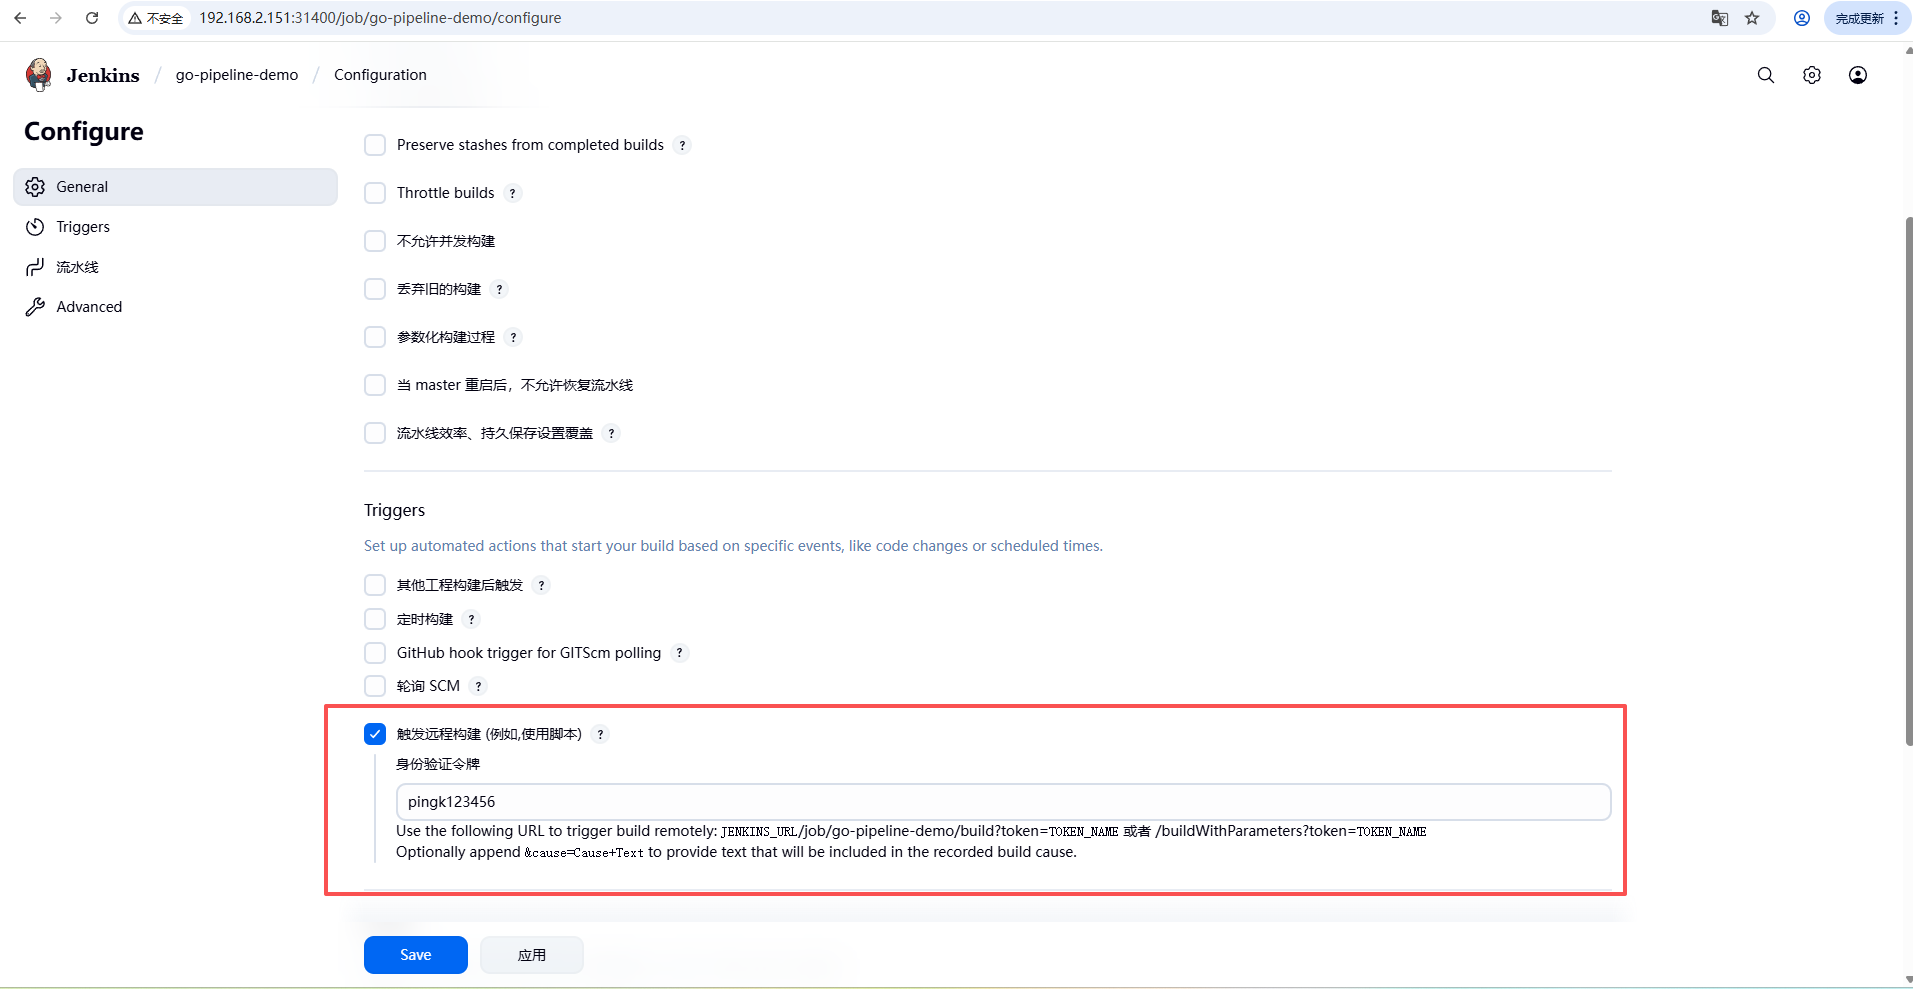
触发器选择触发远程构建,其中 TOKEN_NAME 可以随便写一个字符,但它很重要,因为在 gitlab的 webhook 里就需要用到。按照下面的提示信息,我们拼出一个 URI 地址如下,该地址需要配置到 gitlab 里的 webhook 用来访问 jenkins 中指定的流水线。
http://jenkins-service.cicd-tool.svc.cluster.local:8080/job/go-pipeline-demo/build?token=pingk123456。这里因为是在同一个 k8s 集群内所以使用了 svc 的地址。
总结一下就是,每创建一个 jenkins 的 pipeline 都可以指定一个身份令牌,然后依据提示拼成一个URI 地址给某个 webhook 使用。
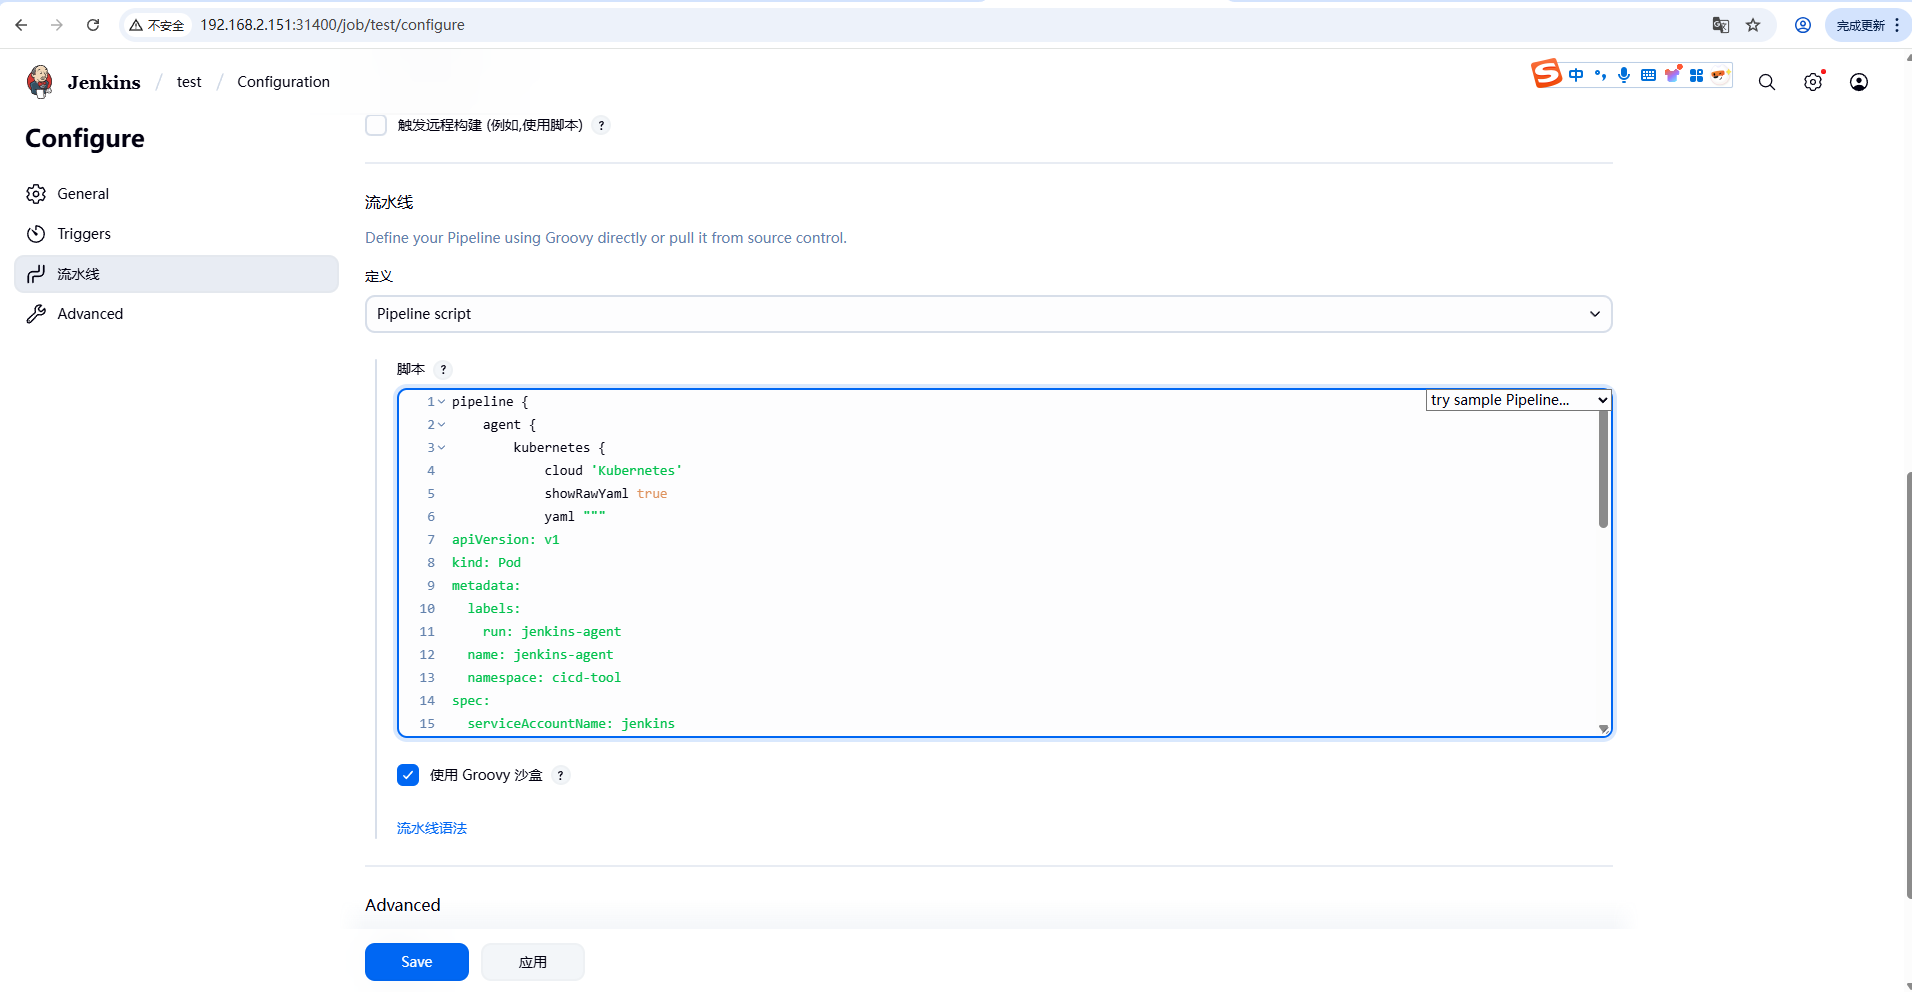
流水线配置:
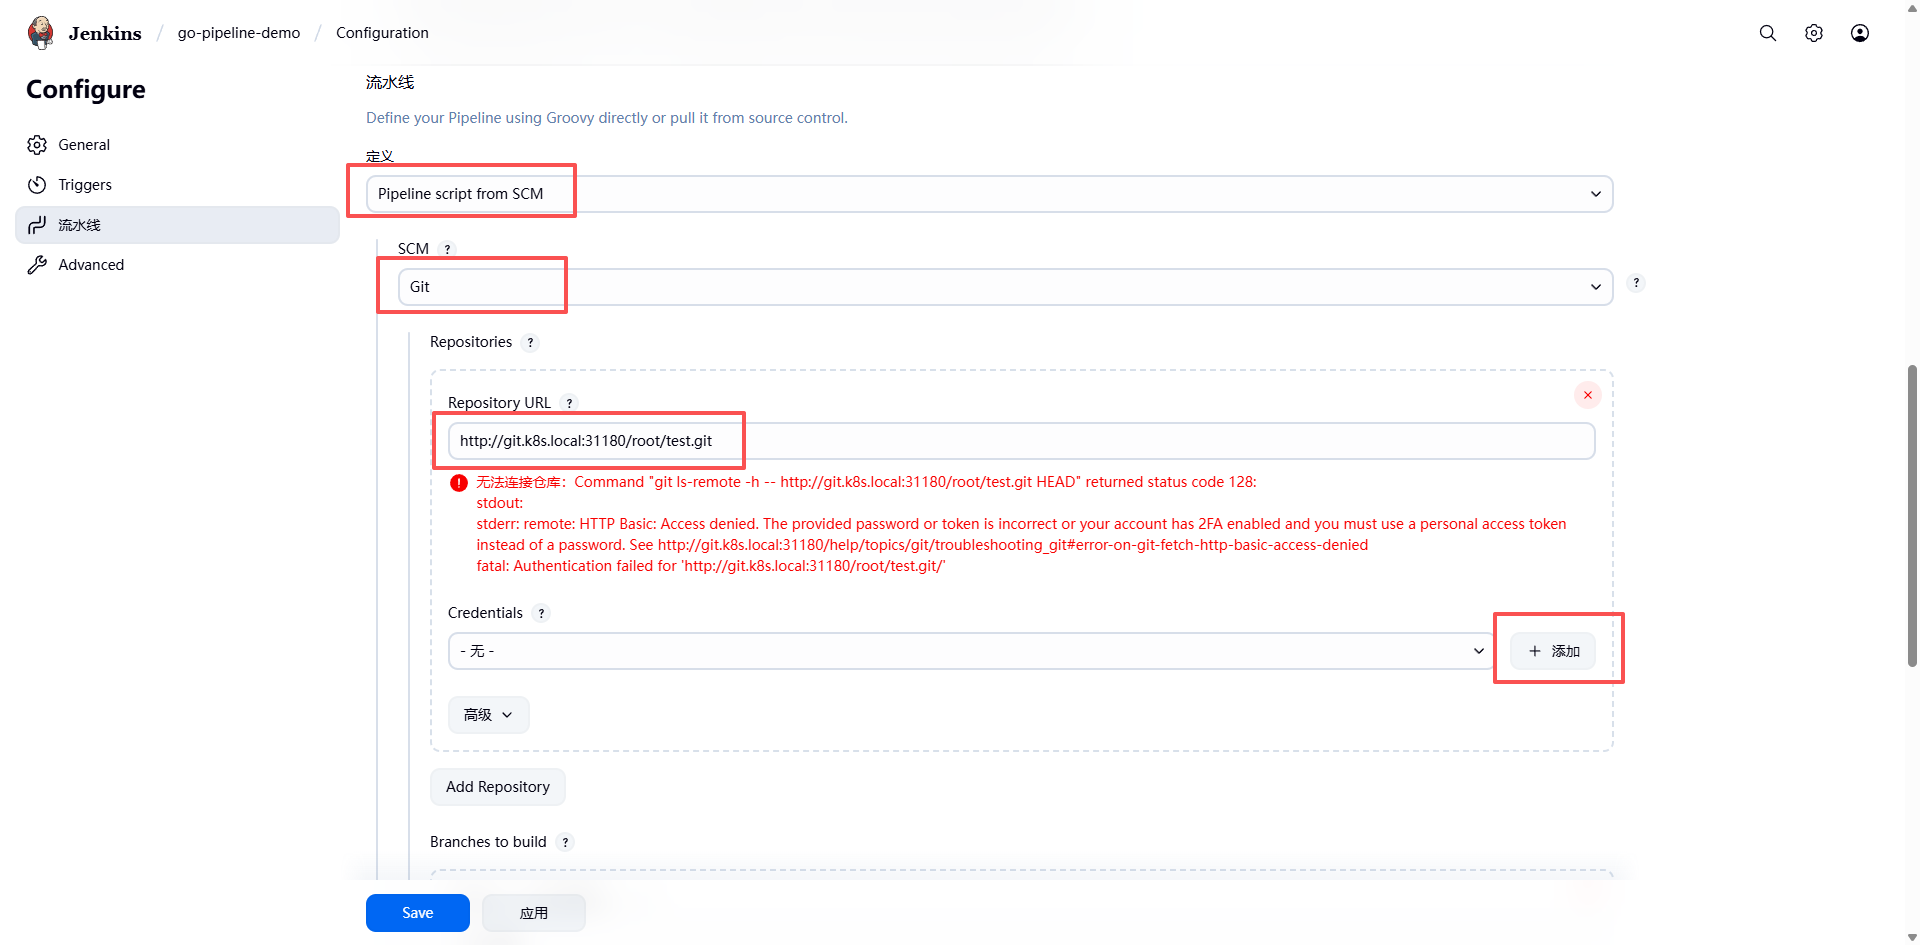
在流水线定义里选择 Pipeline script from SCM,然后在 SCM 中选择 Git,配置好 Git 信息。Jenkins 会去 Git 的项目地址里拉取代码,然后在代码根目录下找到一个叫 Jenkinsfile 的文件执行。该文件就是流水线构建过程代码。
注意:此处的配是用于 Jenkins 访问 GitLab,需要为 Jenkins 能够解析到 git.k8s.local 域名的 IP,此处 Jenkins 运行在 k8s 里,所以需要在 coredns 添加解析。前面已经配置过了,需要注意一点的是解析的 IP 地址与端口号要对应上。
接下来点击 添加 为 Jenkins 添加拉取代码的凭证。
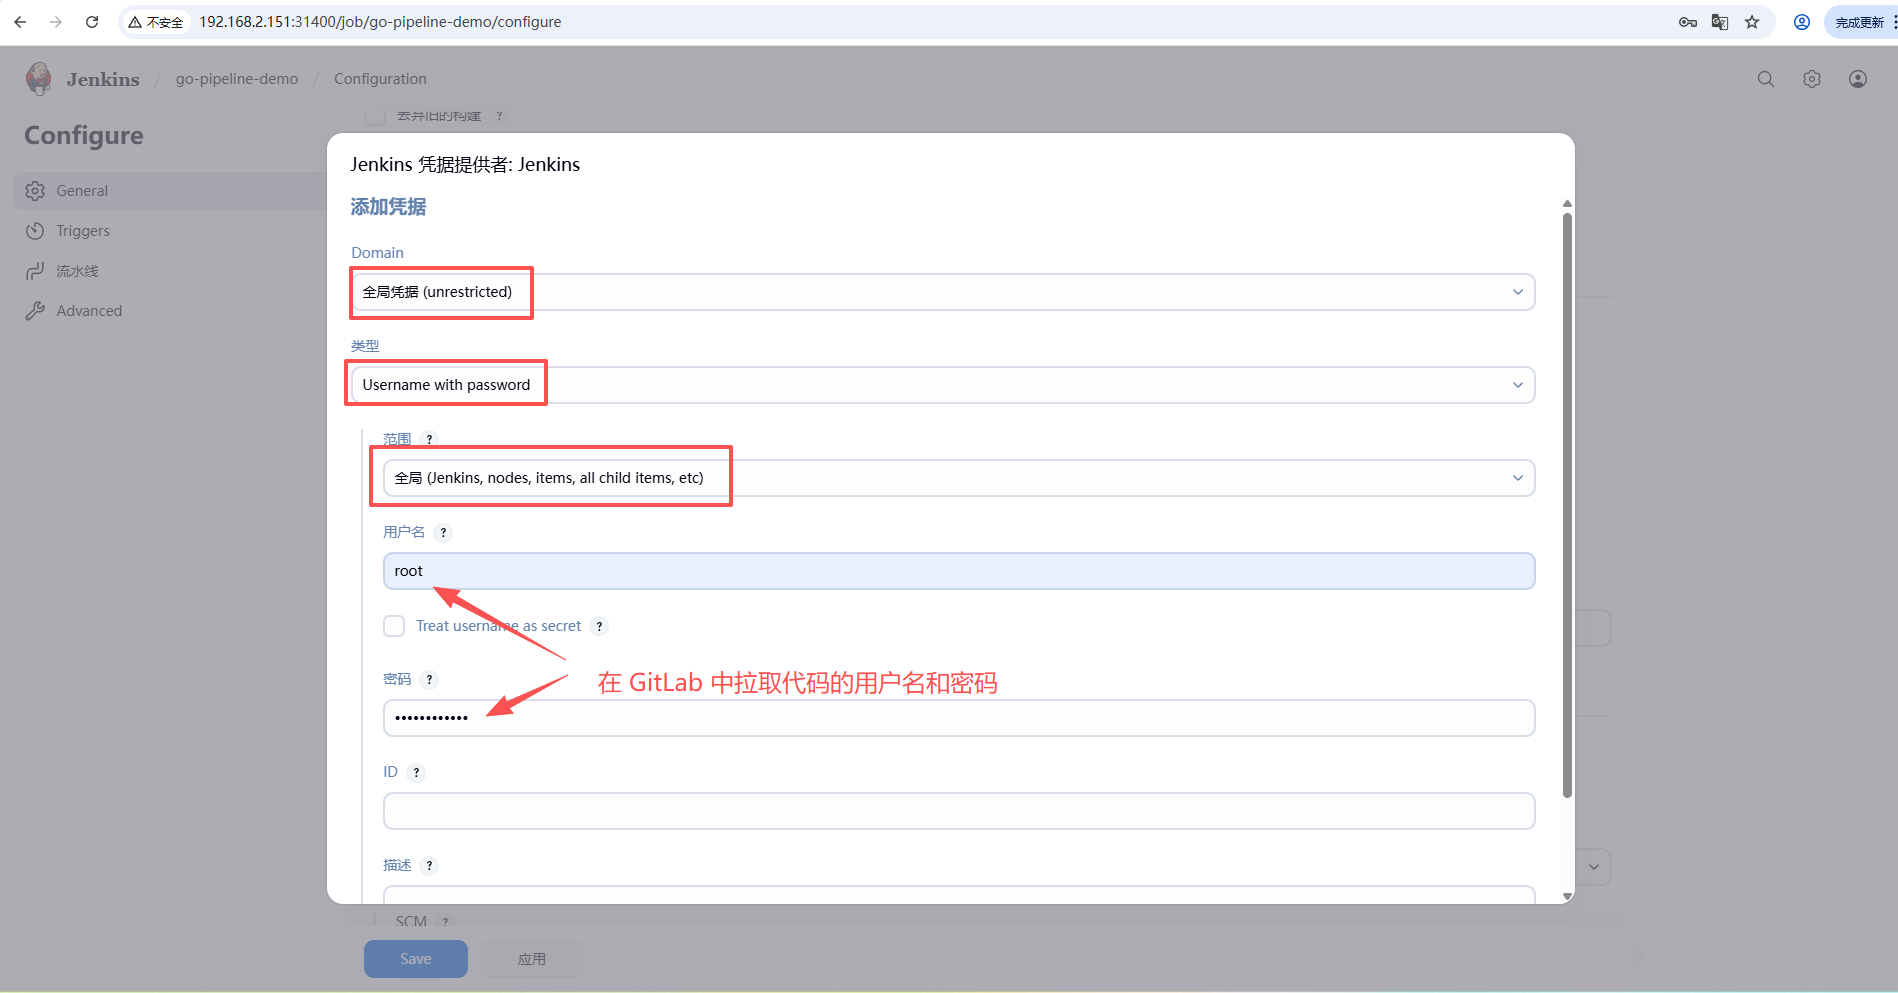

选择刚刚创建的凭证。此时 Jenkins 就可以访问到 GitLab 了。
接下来配置用于构建的分支:
- 如果所有的分支我们都想要进行构建的话,只需要将 Branches to build 留空即可。
- 一般情况下不同的环境对应的分支才需要构建,比如 main、 develop、test 等,平时开发的 feature 或者 bugfix 的分支没必要频繁构建,我们这里就只配置 main 和 develop 两个分支用于构建。
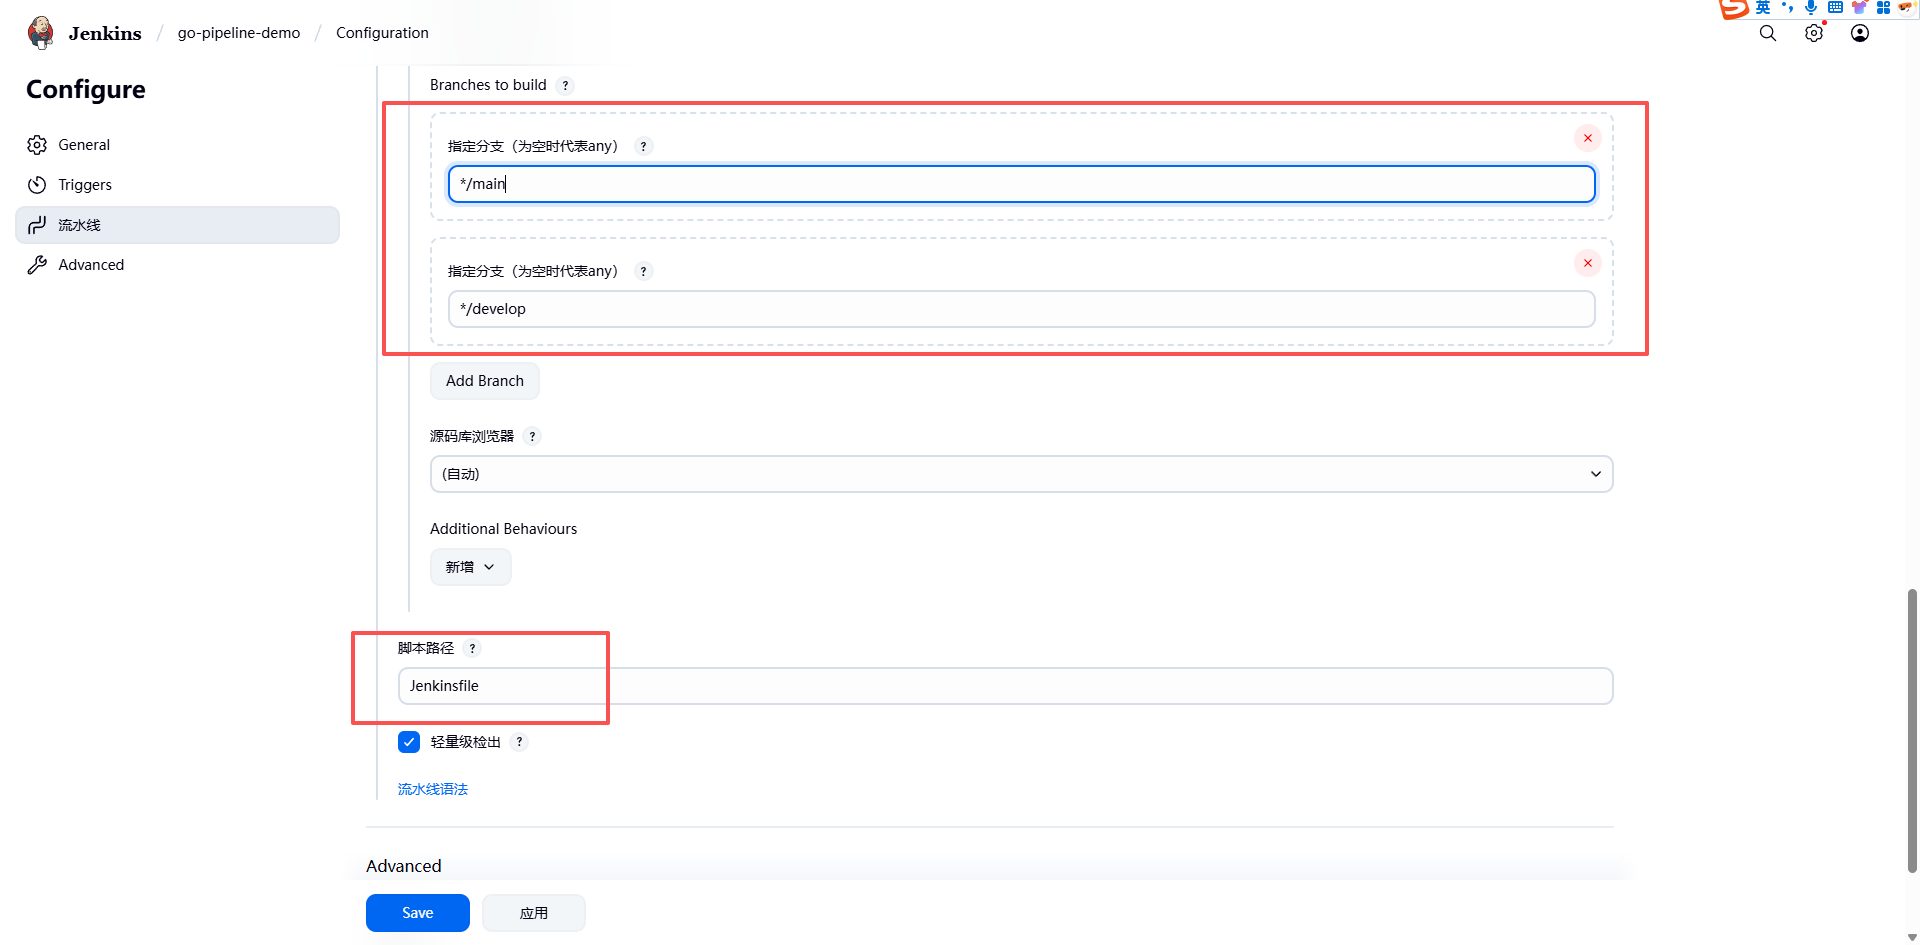
配置完成,点击保存。
5.3. 在 GitLab 里配置 Webhook
项目已经创建好了,我们直接为项目创建 Webhooks 即可,点击 projects ——点击 test 项目——settings——Webhooks。
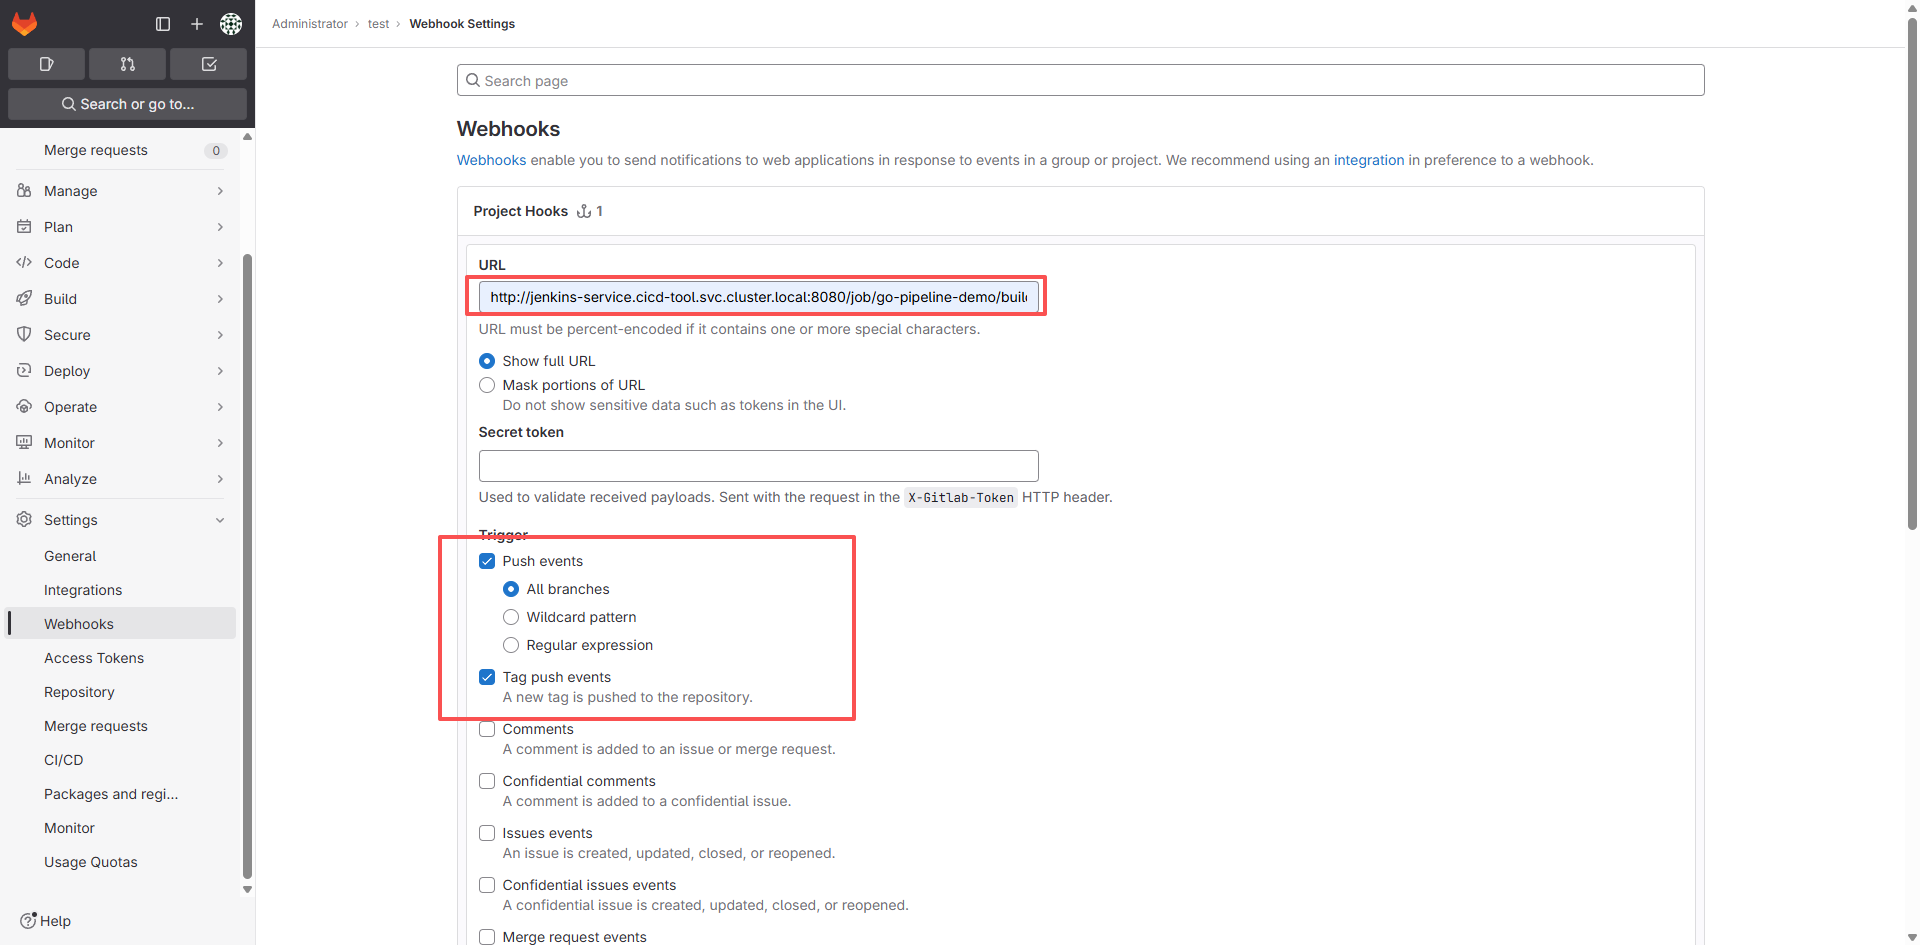

点击 Add webhook,如果在屏幕上面会出现一行粉字: Url is blocked: Requests to the local network are not allowed,则执行如下操作:

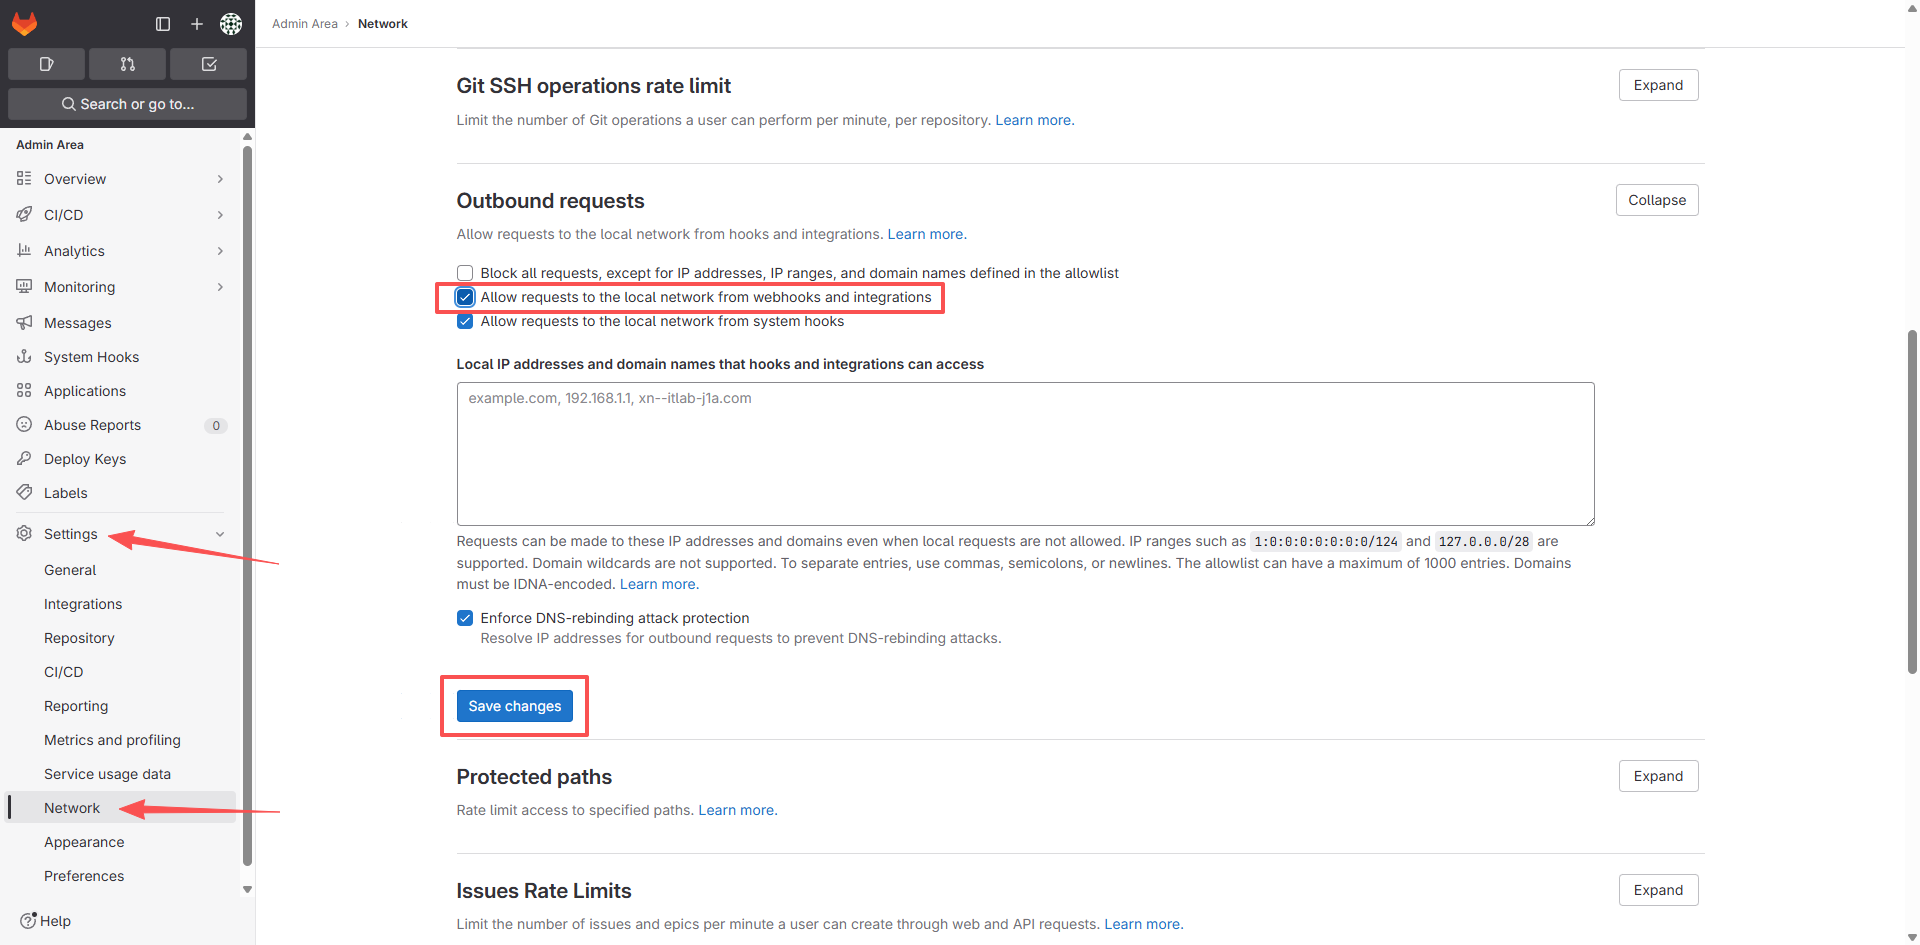
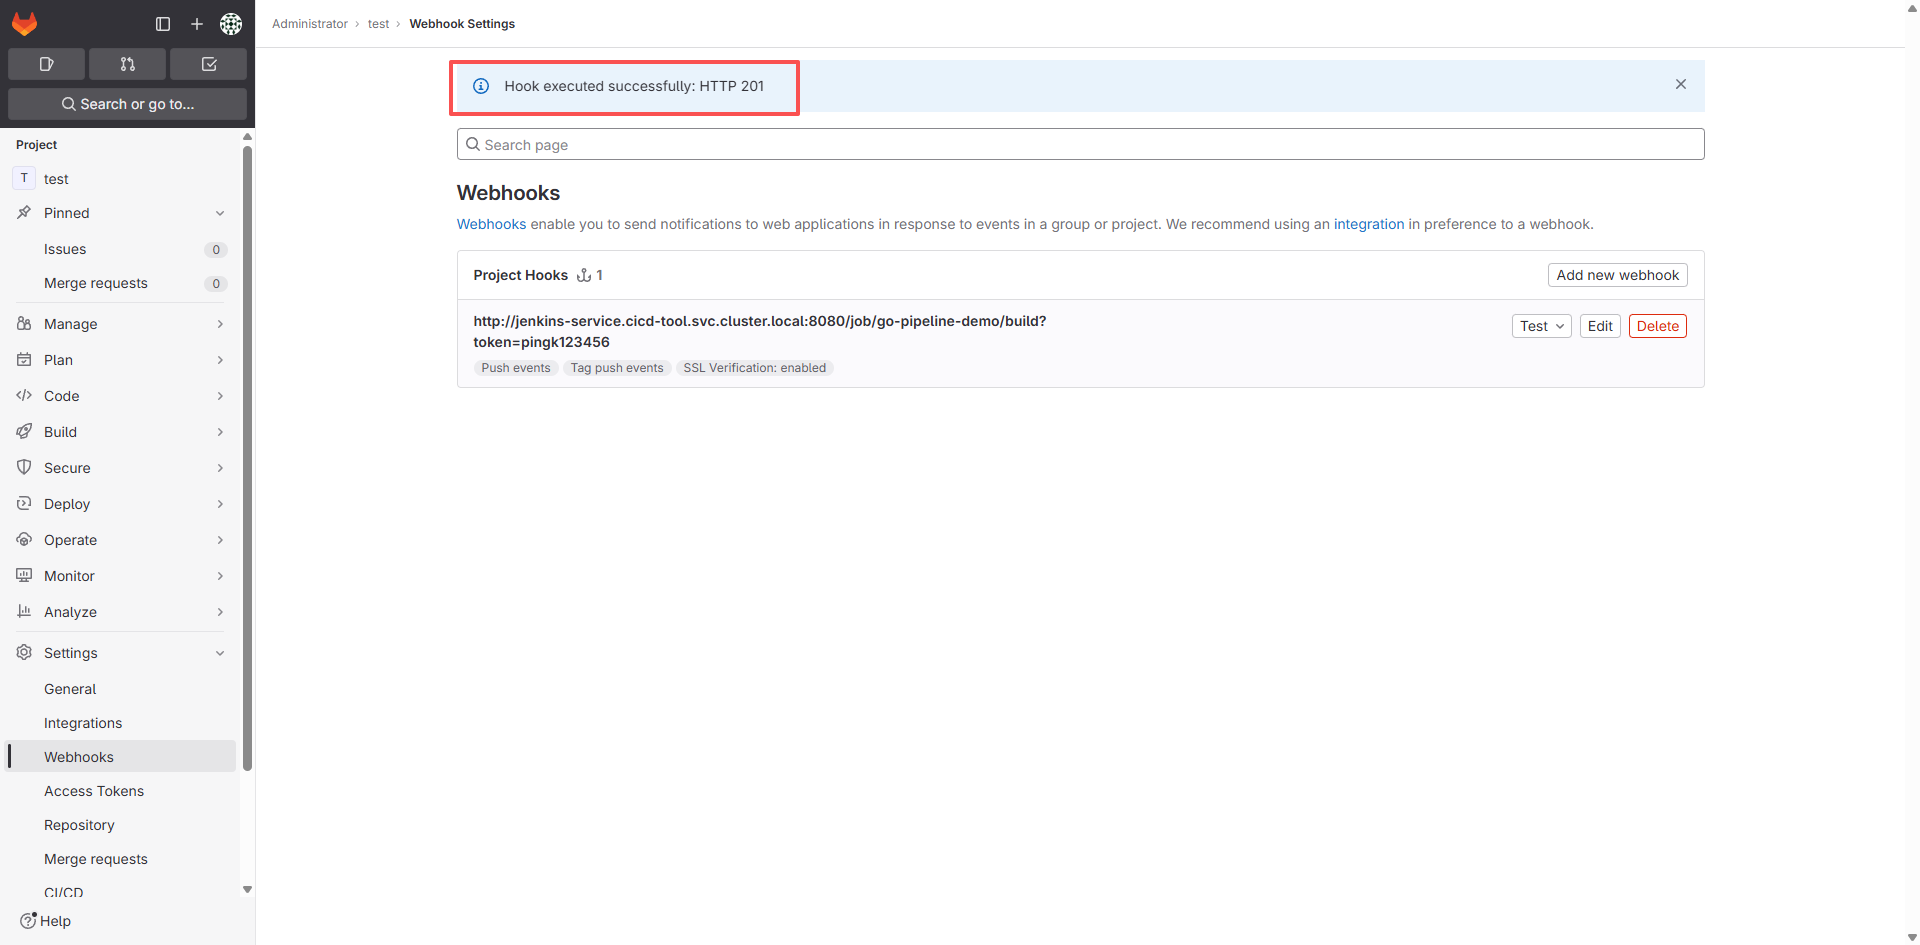
然后重新创建 Webhook,然后点击测试:
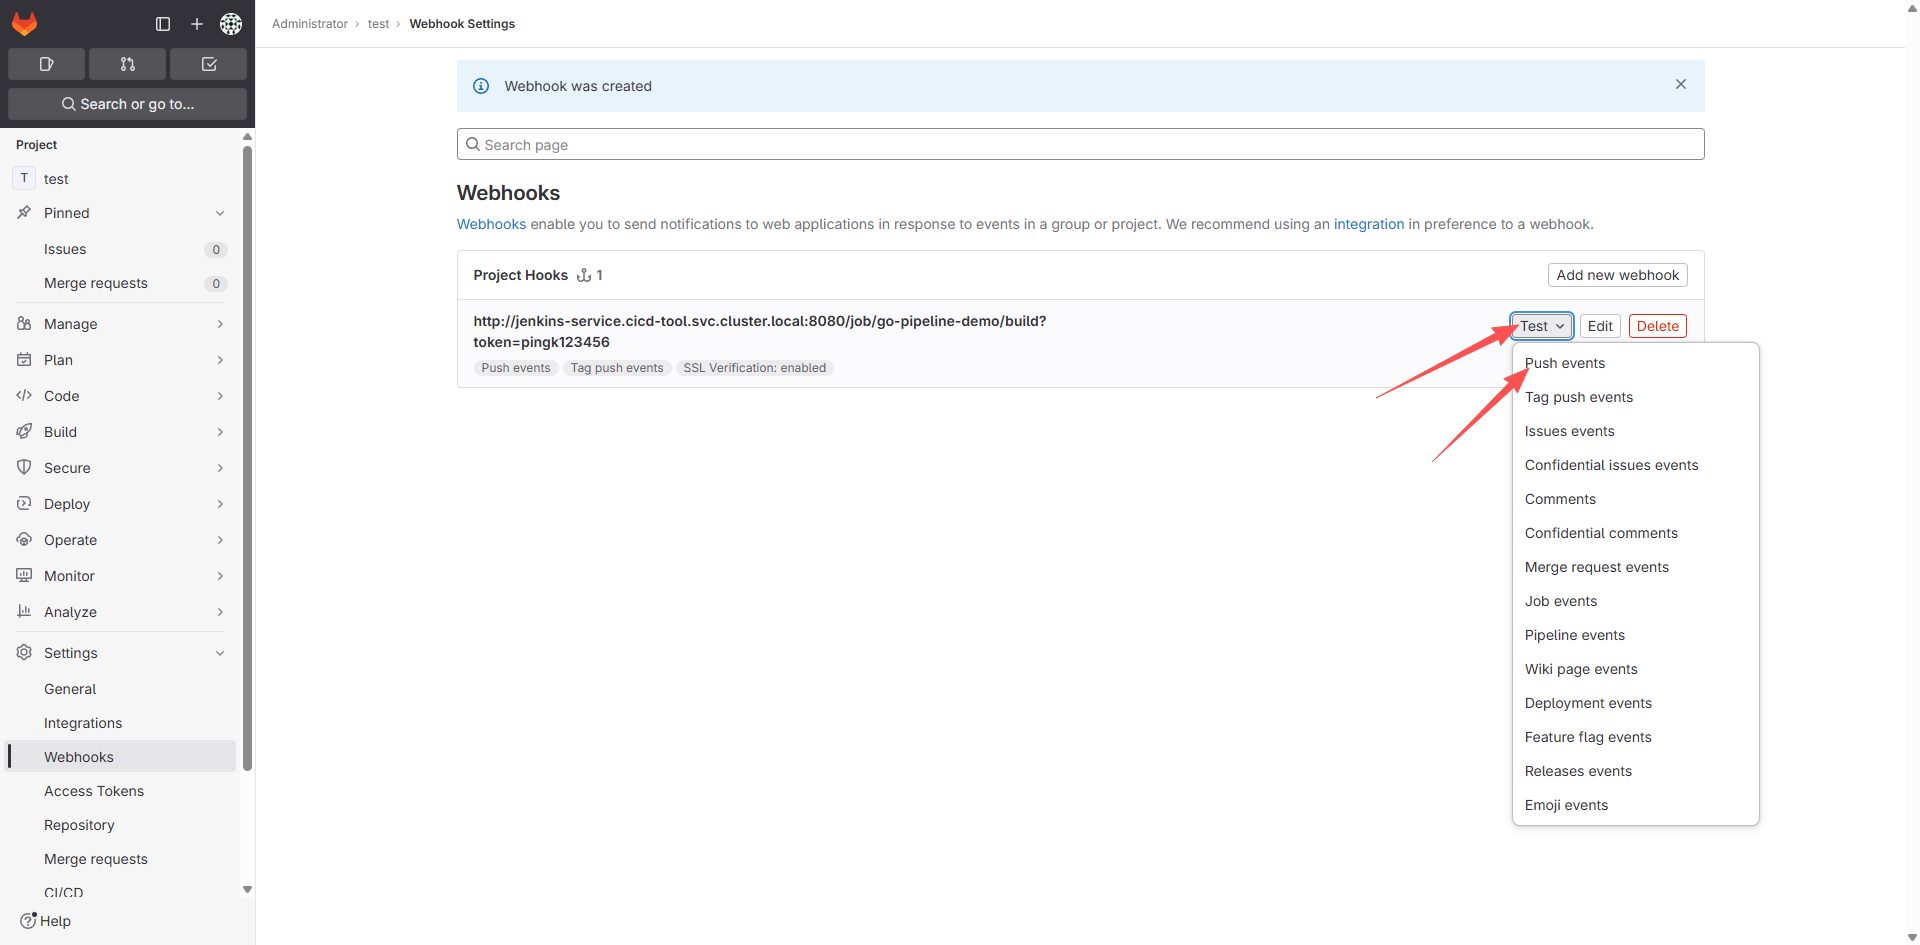
点击 Push events 后会报一个403错误,需要做下面几件事:
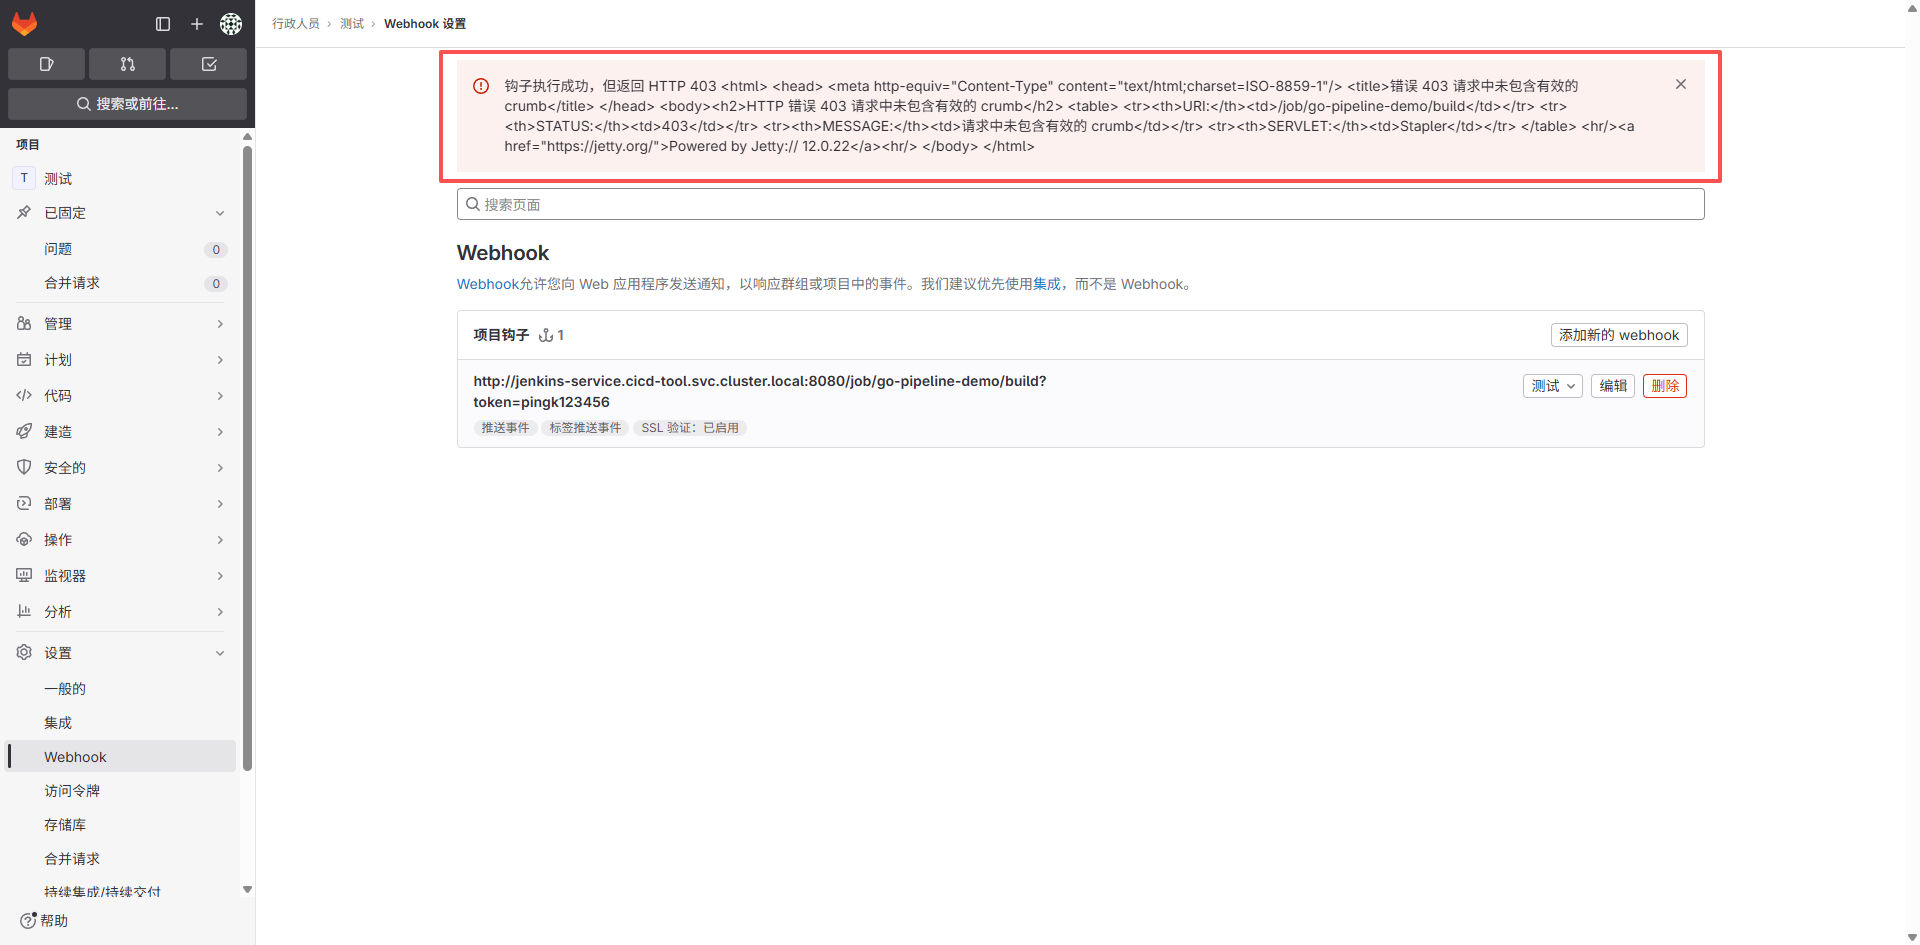
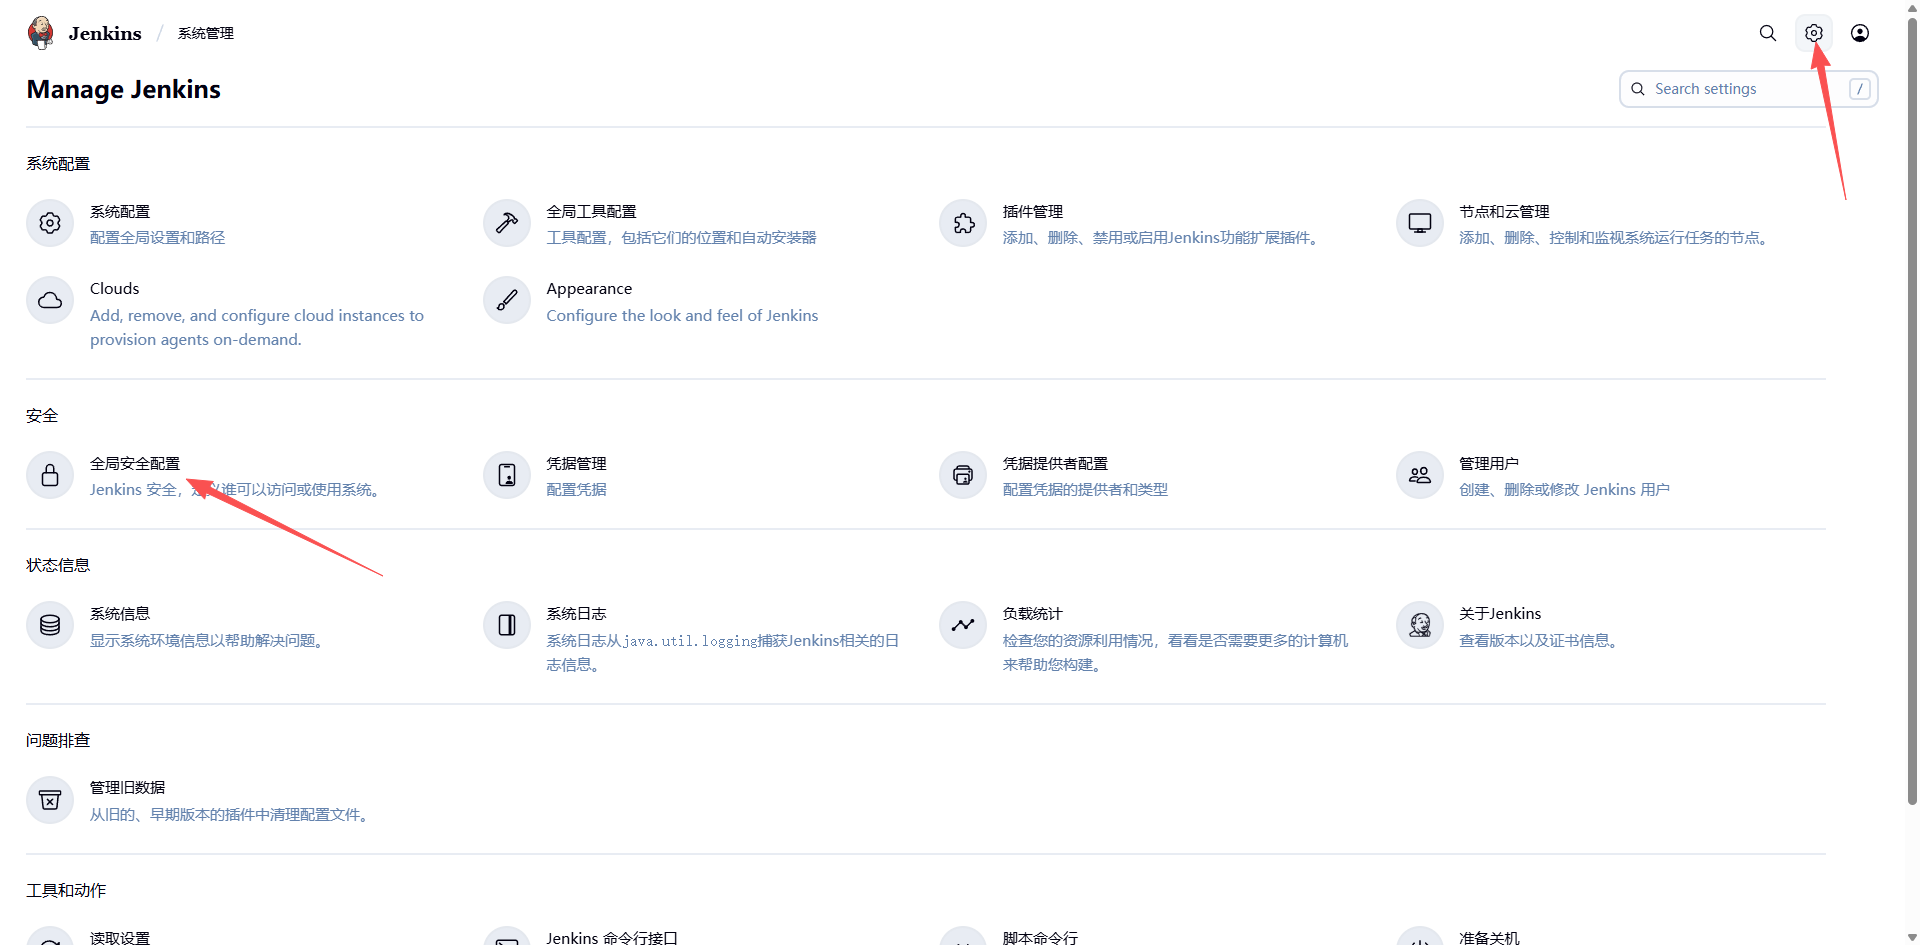
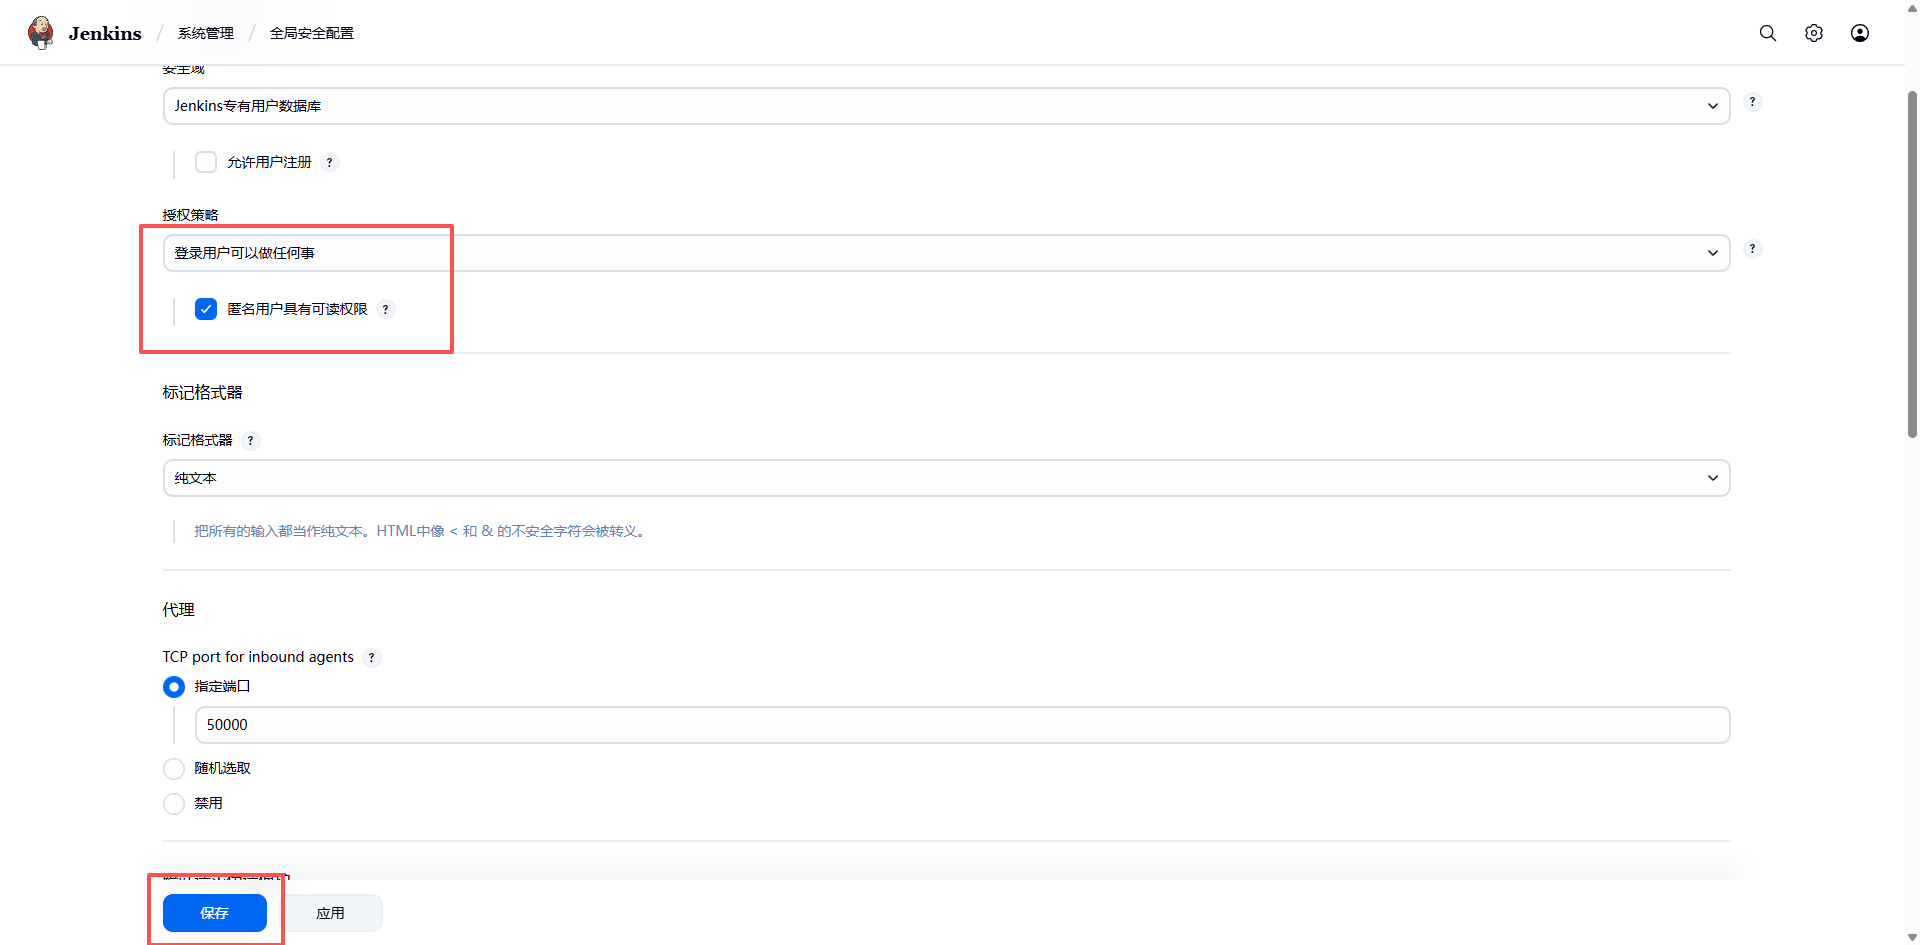
- 需要进入 Jenkins 配置 Jenkins 安全选项
- 由于这里的 Jenkins 是比较新的版本,该版本已经默认取消了 CSRF 的安全配置入口,所以我们需要手动执行一段脚本来禁用 CSRF 的跨站请求保护。
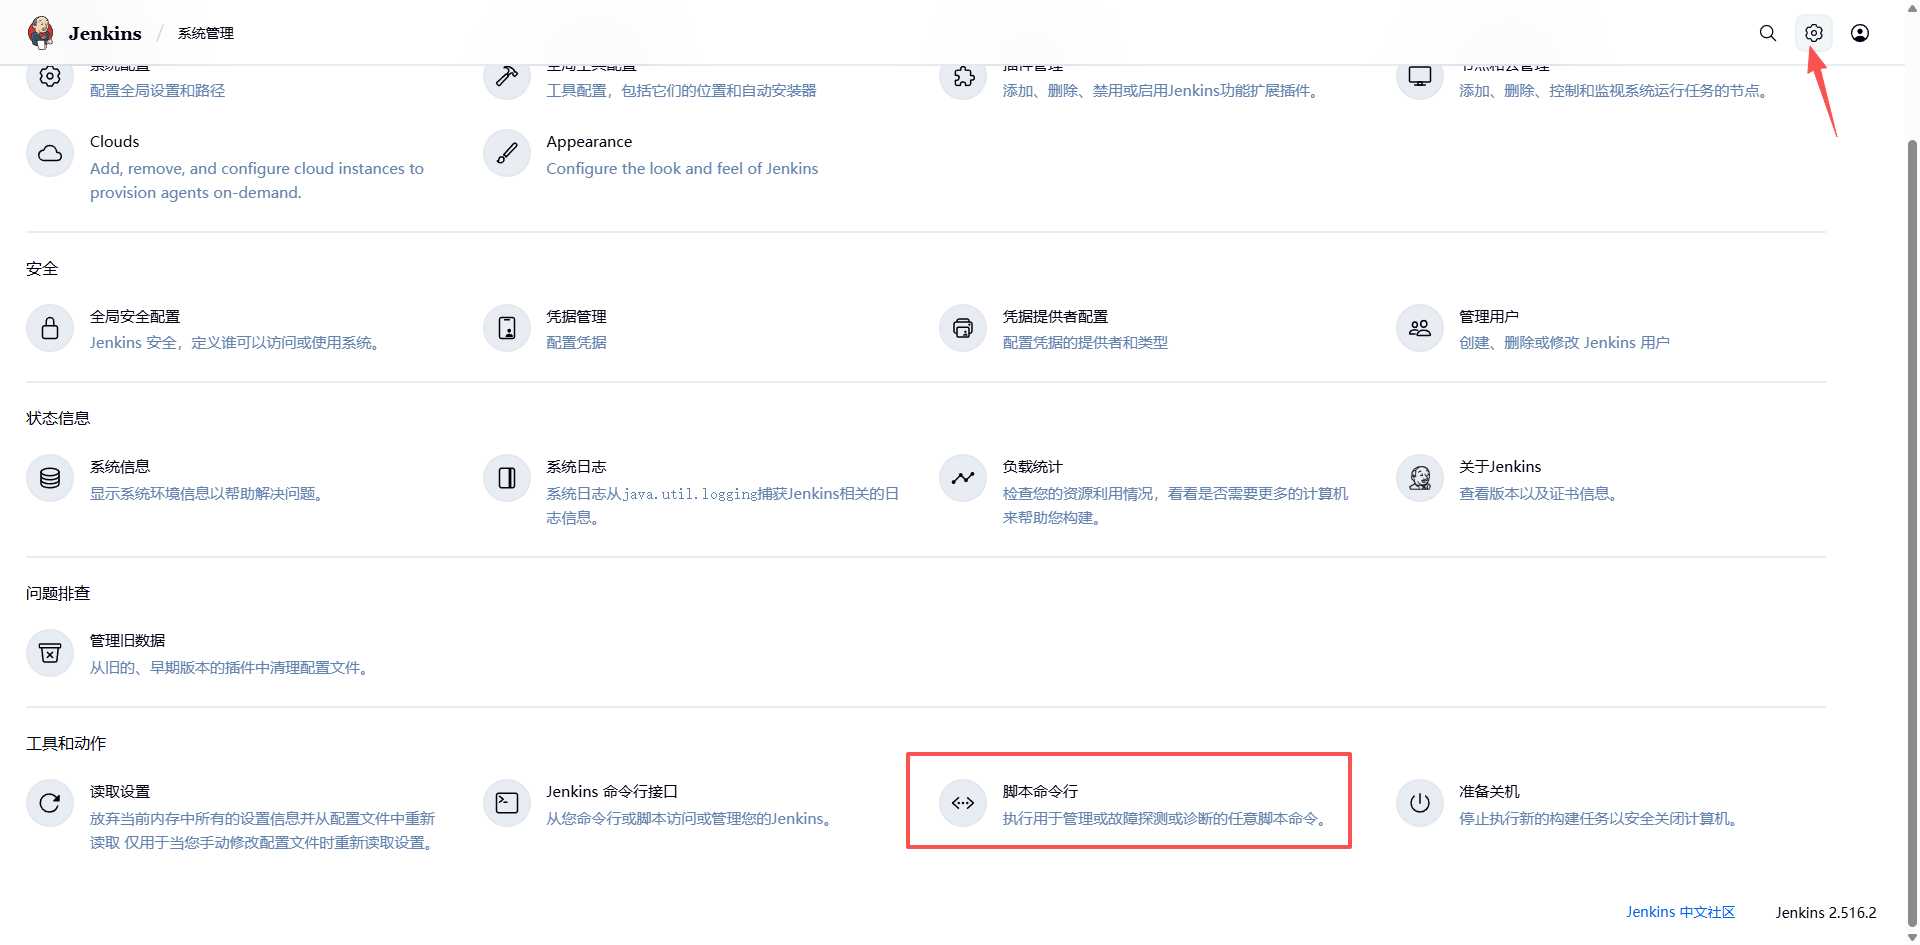
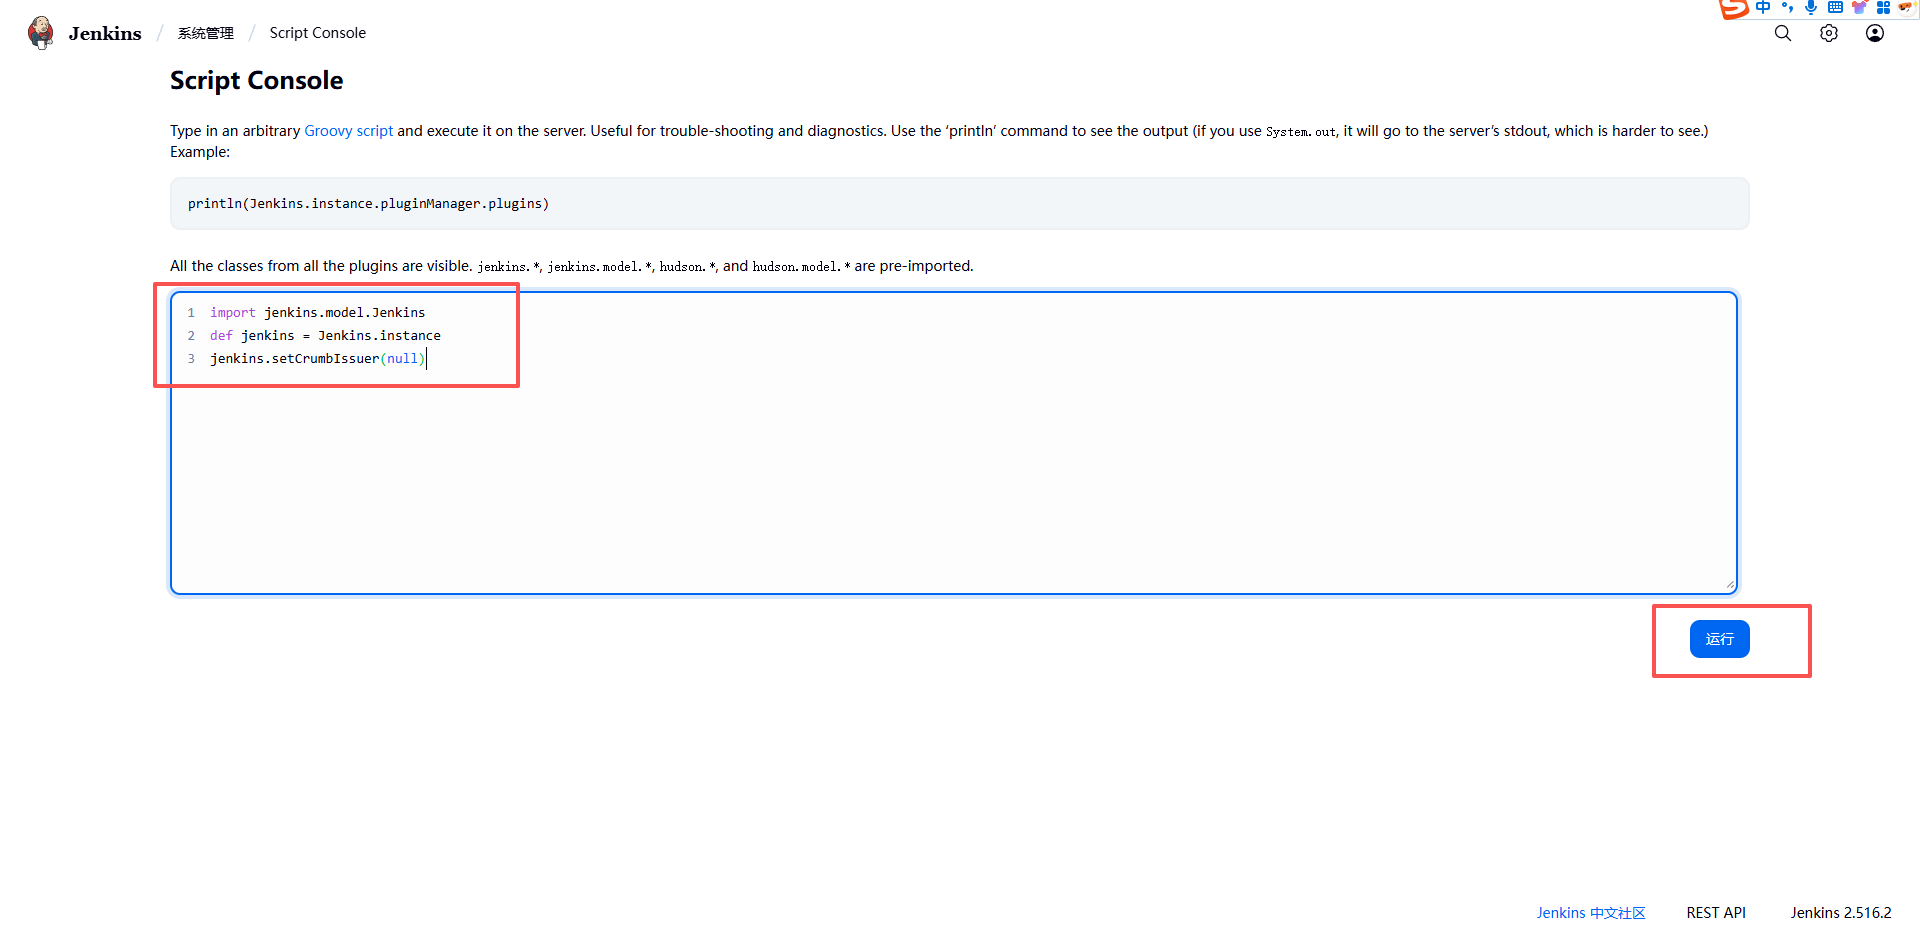
代码:
import jenkins.model.Jenkins
def jenkins = Jenkins.instance
jenkins.setCrumbIssuer(null)- 安装 GitLab 插件,然后重启。
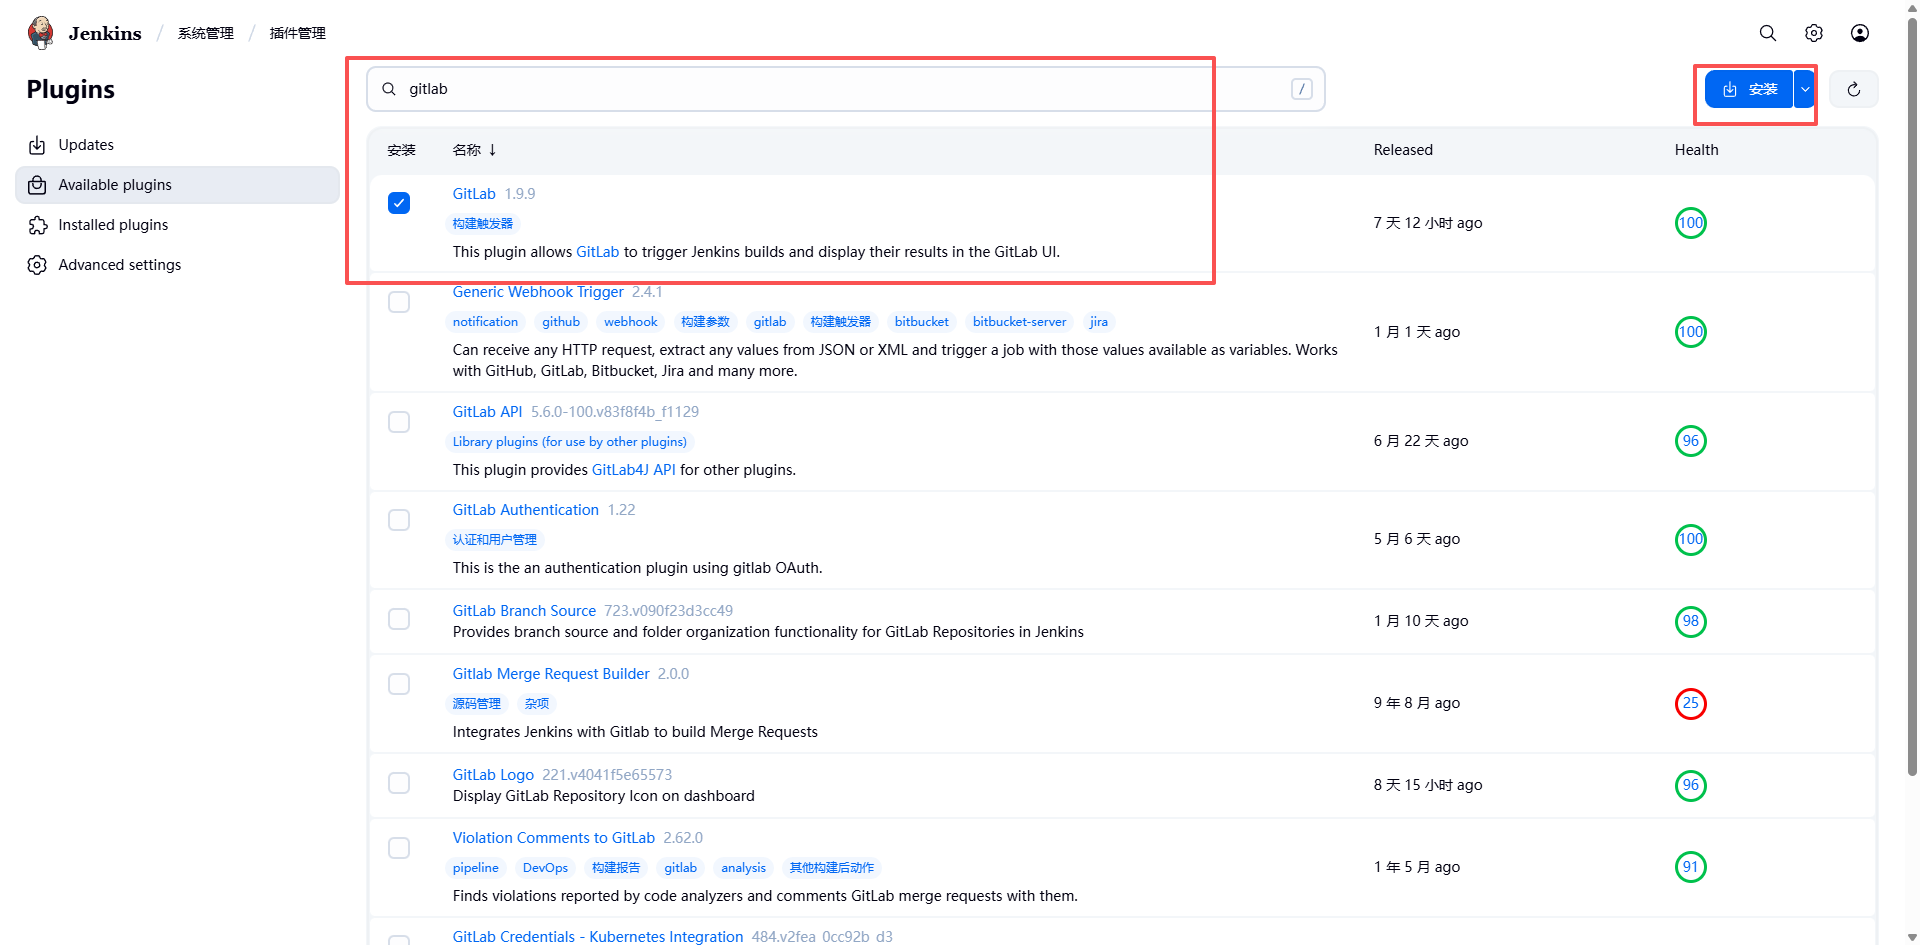
- 然后点击系统管理-》系统配置-》找到 gitlab,去掉勾选:
Enable authentication for '/project' end-point
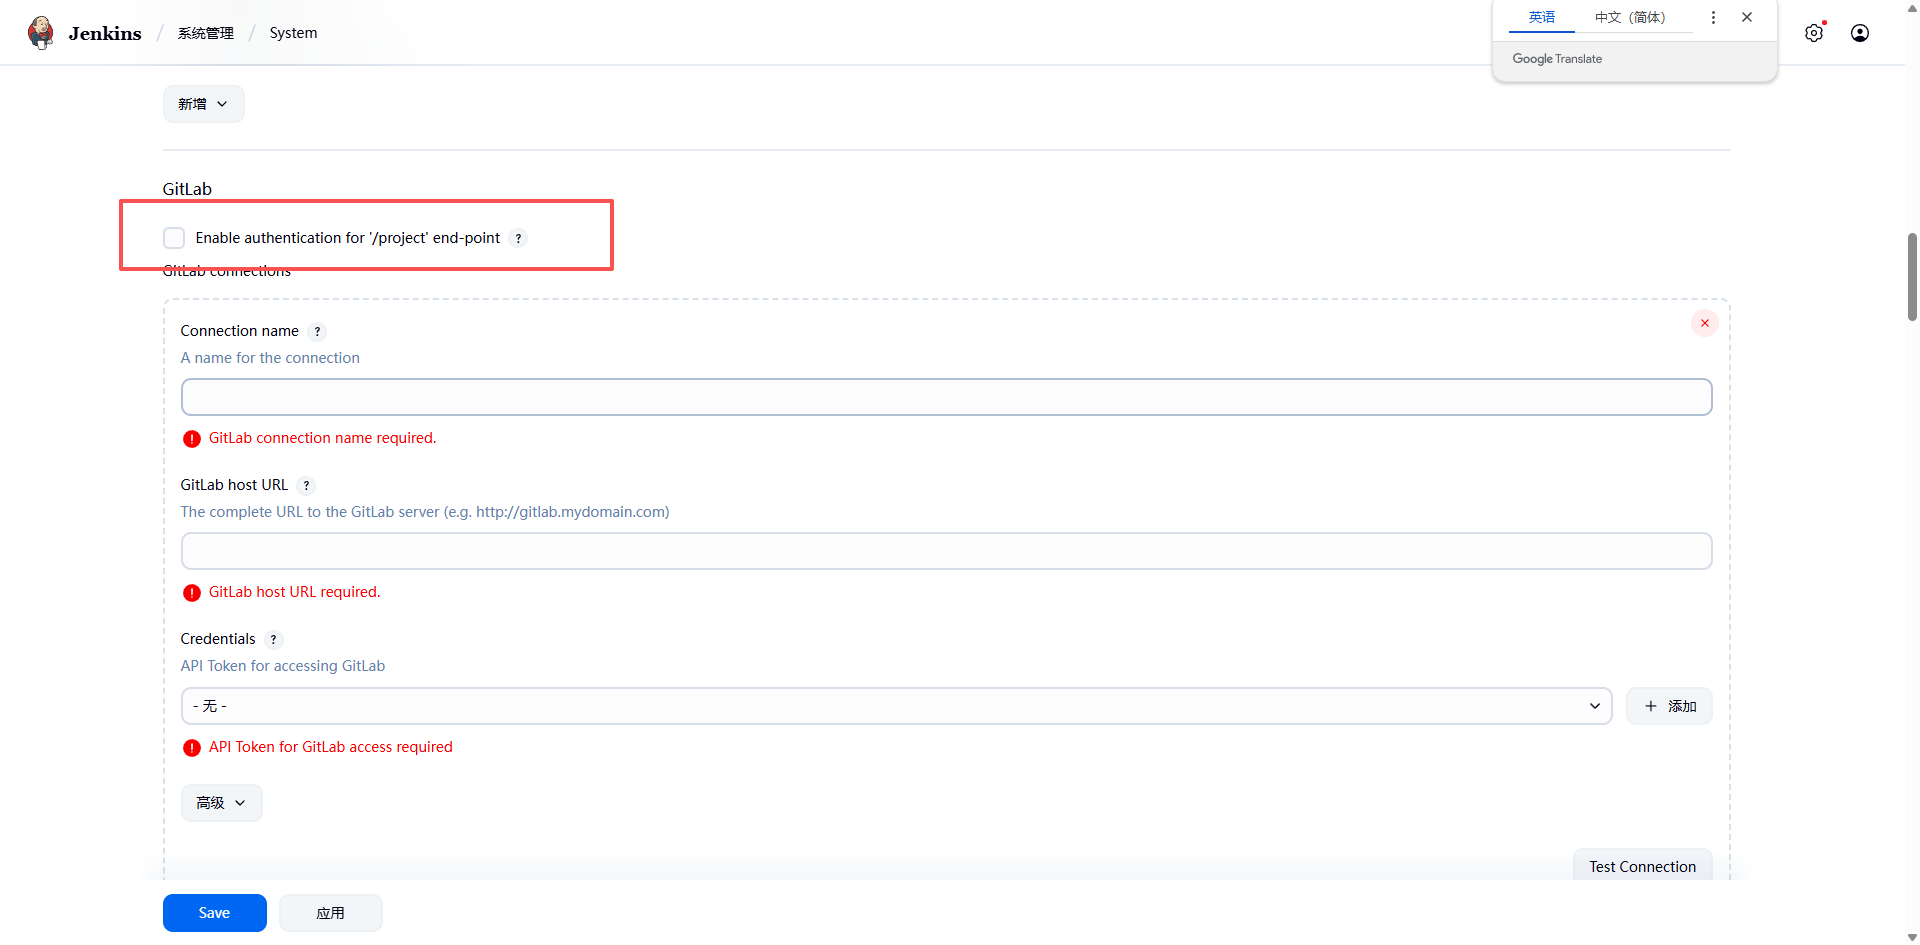
再次测试 GitLab 的 Webhook:
6. 为项目创建 Jenkinsfile 文件
注意:Jekensfile 文件的首字母是一个大写的字母,与 Jenkins 流水线中定义的相匹配。
Jenkinsfile 基本的逻辑就是:
- 指定工作节点
- 拉取代码
- 测试
- 构建(安装依赖包、编译等)
- 构建镜像
- 推送镜像到镜像仓库
- 编写k8s的yaml文件
- 分环境部署(开发、测试、生产)